iOS App Development: Completed Guide
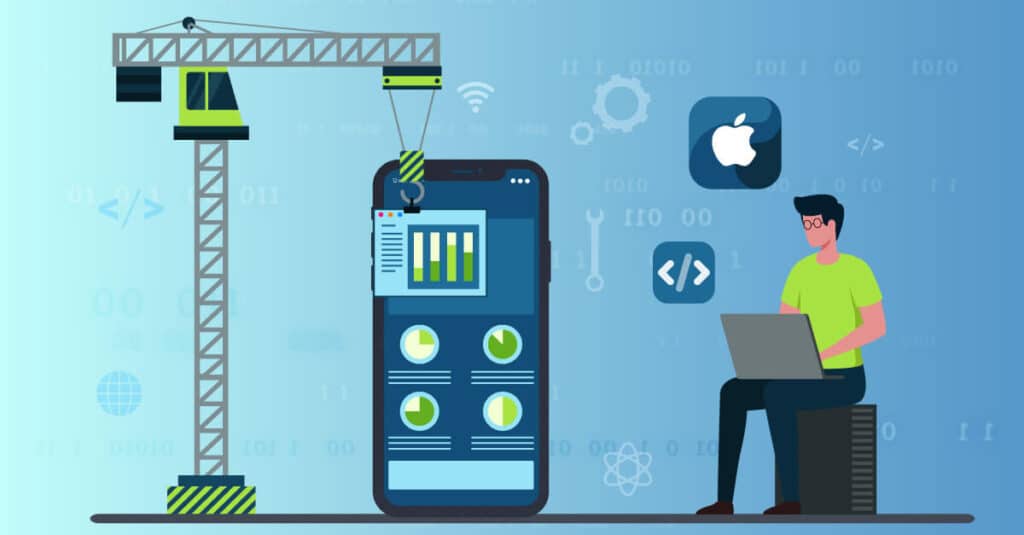
In today’s digital age, mobile applications have become integral to our daily lives. From social networking and entertainment to productivity and education, apps have revolutionized how we interact with technology. If you have ever wondered about the process of creating these incredible applications, you’re in the right place. Welcome to the world of app development!
Generally, App development refers to designing, building, and deploying software applications for mobile devices like smartphones and tablets. It involves a combination of creativity, coding skills, and problem-solving abilities altogether to bring ideas to life. Whether you want to develop a game, a utility tool, or a business application, the possibilities are endless.
To begin the app development journey, firstly you must familiarise yourself with various technologies and frameworks. The two significant platforms dominating the mobile market are iOS (Apple’s operating system) and Android (Google’s). Each platform has development tools, programming languages, and app stores. In this iOS app development guide, we are going through how to make an iOS app.
What is App Development?
App development, or application development, refers to creating software applications specifically designed to run on mobile devices such as smartphones and tablets. These applications, commonly known as apps, serve various purposes and can be found across various industries, e.g. social networking, gaming, entertainment, productivity, education, health, and business.
App development involves designing, coding, and testing to build functional and user-friendly applications. It also requires expertise in programming languages, development frameworks, and software development tools specific to the targeted mobile platform(s).
Two major mobile platforms dominate the market: iOS(Apple iOS app development) and Android. iOS is the operating system developed by Apple for their iPhones, iPads, and iPod Touch devices. At the same time, Android is an open-source operating system developed by Google and used by many smartphone and tablet manufacturers.
What is iOS Development?
iOS Development is the process of making iOS apps for Apple devices like iPhones and iPads.
App development for iOS and Android platforms often requires knowledge of platform-specific programming languages and tools. For app development iOS (iPad app development, iPhone application development), the primary language is Swift, with the development environment being Xcode. On the other hand, Android app development primarily relies on Java or Kotlin as the programming languages, with Android Studio as the primary development environment.
Tools Required in iOS Development
When creating iOS apps, several development tools can enhance your productivity and help you build high-quality applications. Here are some popular development tools for iOS development:
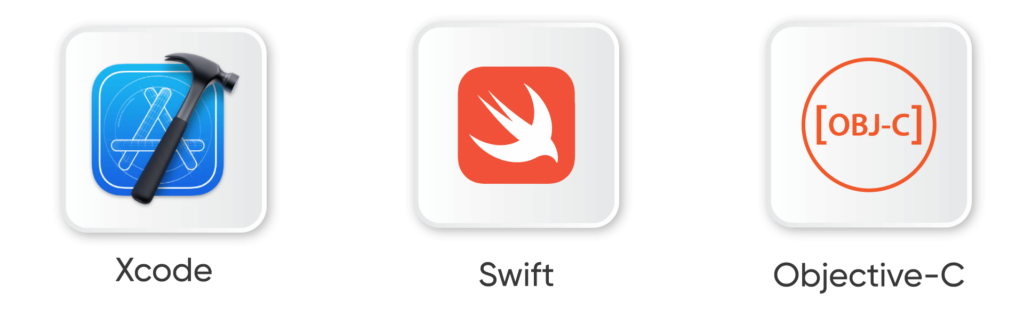
- Xcode – It is an iOS app development IDE (Integrated Development Environment))provided by Apple for developing macOS, iOS,watchOS, and tvOS apps.
- Swift (Programming Language) – Swift is a programming language created by Apple for building apps on iPhones, iPads, Macs, Apple Watches, and Apple TVs. Also, it’s a modern, easy-to-use language that helps developers write code quickly and efficiently.
- Objective-C (Programming Language) – The original language opted for by Steve Jobs, Objective-C, stems from the programming language C. Since Objective-C has a similar structure and syntax to C. This makes this language easy to learn and master for most developers who already know the language C.
Basic Requirements for iOS App Development
Before learning iOS app development, you must fulfill a few basic requirements for creating an iOS app. Here are the critical requirements for iOS app development:
Hardware Requirements: – Mac Computer. iOS app development is primarily supported on macOS. Therefore, you will need a Mac computer (iMac, MacBook, Mac mini, etc.) to run the necessary software and tools for iOS development.
Software Requirements:- Xcode is Apple’s official IDE for iOS app development whereas Swift is the primary programming language for iOS app development. Xcode comes bundled with the Swift compiler, so you don’t need to install it separately.
Apple Developer Account: Finally to distribute your iOS app on the App Store or test your app on physical devices, you must enroll in the Apple Developer Program.
How To Prepare Your Environment For iOS App Development?
Preparing your environment for iOS app development involves setting up your Mac computer’s software, tools, and configurations. Here’s a step-by-step guide to how to create an iOS app.
- Get a Mac Computer: Firstly ensure you have a Mac computer that meets the minimum system requirements specified by Apple for the version of Xcode you plan to use.
- Install Xcode: Open the Mac App Store on your Mac computer. Search for the “Xcode” keyword, then click on the Xcode app and Install It.
- Set Up an Apple Developer Account: If you don’t have one already, enroll in the Apple Developer Program at https://developer.apple.com/programs/. There is an annual membership fee associated with the program.
- Launch Xcode and Accept Licence Agreement: Open Xcode from the Applications folder or Launchpad.
- Configure Xcode Preferences: In Xcode, click “Xcode” in the menu bar and select “Preferences.” Configure the preferences according to your preferences and project requirements.
- Test on iOS Simulator: Build and run your Project to test it on the iOS Simulator. Xcode will launch the simulator, and your app will be installed and launched on the selected device.
Once you have completed these steps, your environment should be ready for iOS app development. You can start creating, coding, and testing your iOS applications using Xcode and Swift.
What is iOS App Architecture?
iOS app architecture refers to the organization and structure of an iOS application’s codebase, defining how various components interact and work together to create a functional and maintainable app. A well-designed architecture promotes code reusability, separation of concerns, modularity, and testability altogether.
There are several architectural patterns commonly used in iOS app development. Here are some of the popular ones:
Model-View-Controller (MVC):
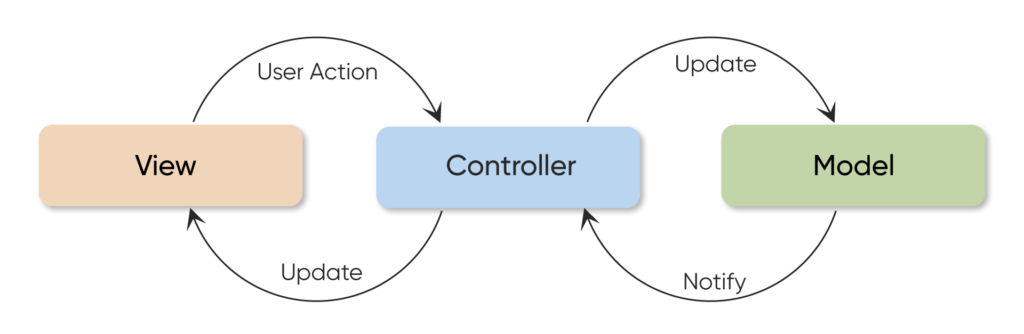
- MVC is the traditional and most widely used architecture in iOS development.
- The Model represents the data and business logic of the application.
- View represents the user interface (UI) elements that display the data.
- The controller acts as the intermediary between the Model and the View, handling user input and updating the Model and View accordingly.
Model-View-ViewModel (MVVM):
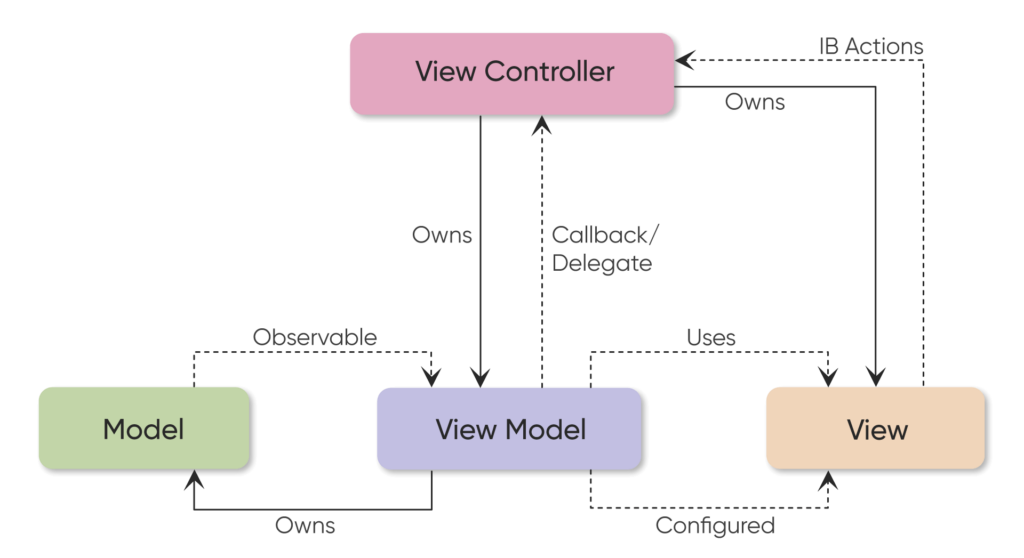
- MVVM is an architectural pattern that promotes a clear separation of concerns and facilitates unit testing.
- The Model represents the data and business logic.
- The View displays the UI elements and binds to the ViewModel for data updates.
- ViewModel exposes data and commands to the View and interacts with the Model.
- The View and ViewModel are loosely coupled through data binding.
Model-View-Presenter (MVP):
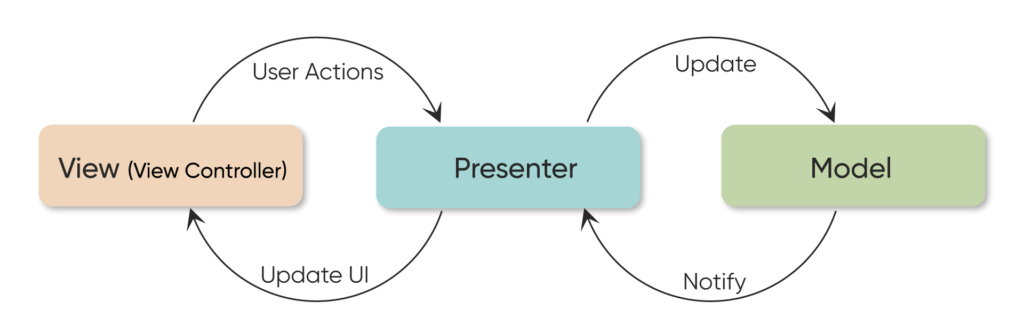
- MVP is an architectural pattern that emphasizes the separation of concerns and facilitates testability.
- The Model represents the data and business logic.
- The View displays the UI elements and communicates with the Presenter.
- The Presenter acts as the intermediary between the Model and the View, handling user input, updating the View, and manipulating the Model.
VIPER:
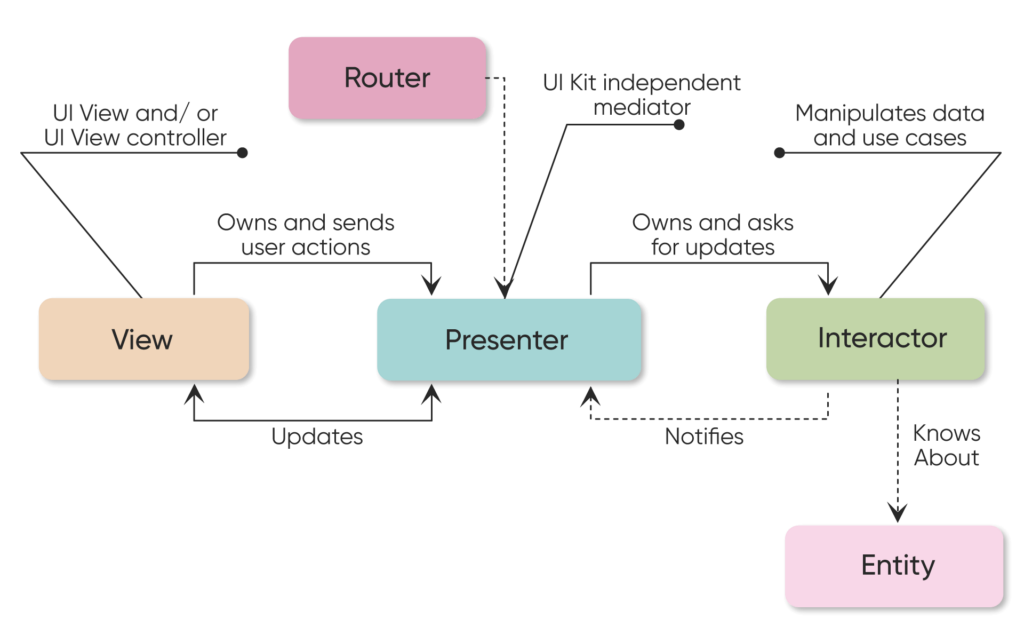
- VIPER is an architectural pattern for View, Interactor, Presenter, Entity, and Router.
- View represents the UI elements and handles user input.
- The interactor contains the business logic and performs the requested actions.
- The Presenter handles the presentation logic and updates the View and Interactor.
- Entity represents the data model used in the app.
- The router handles navigation between different screens.
These architectural patterns provide different approaches to structuring an iOS app’s codebase. The choice of architecture depends on factors such as project requirements, complexity, team collaboration, scalability, and personal preference
Components of iOS App Development:-
Here are the critical components involved in iOS app development
1. User Interface
- Views: Views represent the visual elements that make up the user interface of an iOS app. They also include buttons, labels, text fields, images, and other interactive components.
- View Controllers: View controllers manage the presentation and behavior of views.
- Storyboards and Interface Builder: Storyboards visually represent the app’s user interface.
2. Data Management:
- Models: Models represent the data structures and logic of an application.
- Networking: Networking components enable communication with web services and APIs. iOS provides libraries such as URLSession for making HTTP requests and handling network responses.
3. App Logic and Functionality:
- Controllers and Coordinators: Controllers and coordinators handle the app’s logic and coordinate data flow and actions between various components. In addition, they manage user input, perform business logic, and orchestrate the interactions between views and models.
- Notifications: Notifications provide a way to communicate and broadcast information within an app. They enable you to send and receive messages or signals to trigger actions or update the UI.
- Background Tasks: iOS allows apps to execute tasks in the background, such as fetching data, updating content, or performing long-running operations while the app is not in the foreground.
These components collectively form the foundation of an iOS app.
What are the iOS Design and Development Guidelines?
iOS design guidelines provide a set of principles and recommendations to ensure a consistent and intuitive user experience across iOS apps. These guidelines are provided by Apple and are aimed at creating visually appealing, user-friendly, and functional app interfaces.
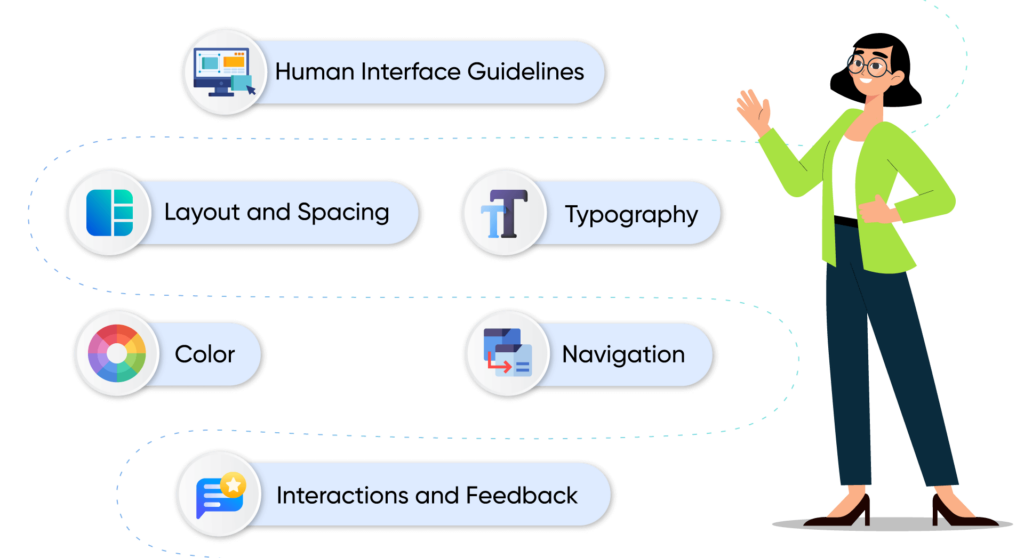
Here are some essential iOS design guidelines to consider:
a. Human Interface Guidelines:
- Consistency: Follow consistent design patterns and behaviors to ensure users can navigate and interact with your app familiarly.
- Clarity: Use clear, easy-to-understand language, icons, and visual elements to convey information and guide users.
- Direct Manipulation: Enable direct manipulation of on-screen objects through gestures, such as tapping, swiping, and dragging, to enhance user engagement.
b. Layout and Spacing:
- Use appropriate spacing and alignment to create a visually balanced and harmonious layout.
- Utilize layout constraints and adaptive layouts to ensure your app’s UI adjusts correctly on different devices and orientations.
c. Typography:
- Use font weights and styles to create a visual hierarchy and emphasize important content.
- Maintain appropriate line heights, letter spacing, and paragraph spacing for optimal readability.
d. Color:
- Use a limited, harmonious color palette that aligns with your app’s brand and purpose.
e. Navigation:
- Use standard navigation patterns like tab bars, navigation bars, and swipe gestures to ensure a familiar and intuitive navigation experience.
f. Interactions and Feedback:
- Use animations, transitions, and subtle micro-interactions to enhance your app’s perceived responsiveness and interactivity.
Development Guideline:-
Regarding iOS app development, following specific guidelines and best practices can help ensure your app is well-designed, functional, and compatible with the iOS platform. Here are some iOS development guidelines to consider:
- Use Native iOS Frameworks: Leverage the power of native iOS frameworks Apple provides, such as UIKit, Core Data, Core Animation, and Core Location.
- Follow Apple’s Coding Conventions: Use consistent naming conventions, indentation, and formatting to ensure readability and maintainability of your code.
- Take Advantage of Swift Features: Utilize Swift’s strong typing, optional, error handling, and functional programming features to enhance code readability and reduce errors.
- Use Auto Layout and Adaptive Layouts: Design your app’s UI to be flexible and responsive using constraints, size classes, and adaptive layouts to provide a consistent experience across various iOS devices.
- Handle Device Orientations and Sizes: Ensure your app’s UI and layout adapt correctly to different device orientations and screen sizes. Test your app on various iOS devices and use size classes and constraints to provide a consistent experience.
- Test and Debug Thoroughly: Conduct comprehensive testing to identify and fix bugs, handle edge cases, and ensure the stability and reliability of your app. Use Xcode’s debugging tools, write unit tests, and perform integration testing to catch and resolve issues during development.
By following these iOS development guidelines, you can create high-quality, efficient, and user-friendly iOS apps that provide a seamless experience for your users and adhere to Apple’s standards.
Let’s see how to start developing iOS apps. You can start your iOS app development project with Following Steps.
How to Start Your App Development Project?
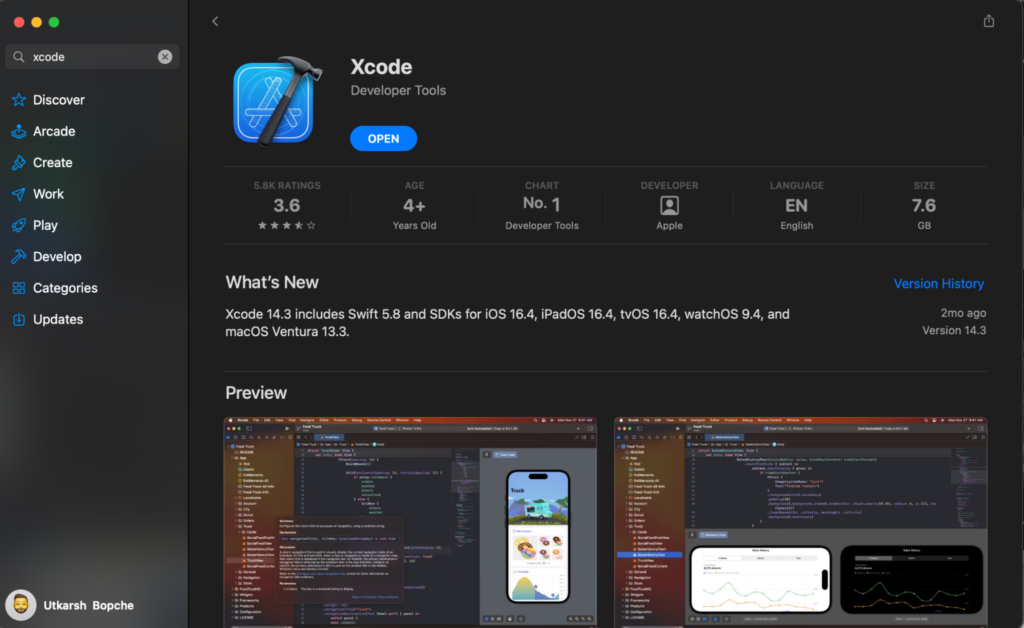
Step 1:- Download and Install Xcode
You can download Xcode from the App Store Present on your Mac System.
If you want an older version of Xcode, please refer to this link https://developer.apple.com/download/all/
Step 2:- Create Your Project
Once we install Xcode, we can start with Project Creation.
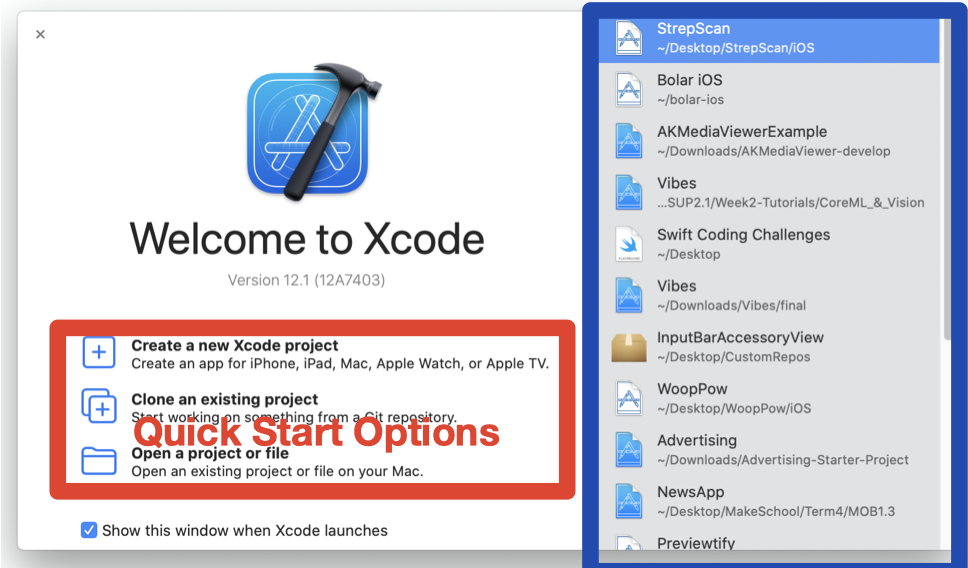
Open Xcode -> Click on Create new Xcode Project.
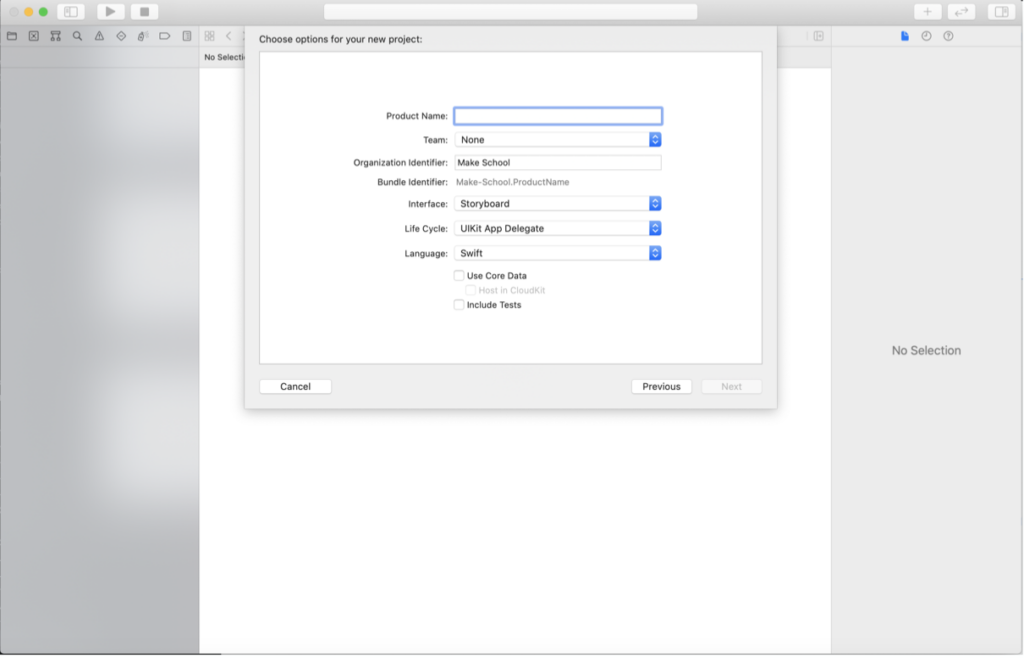
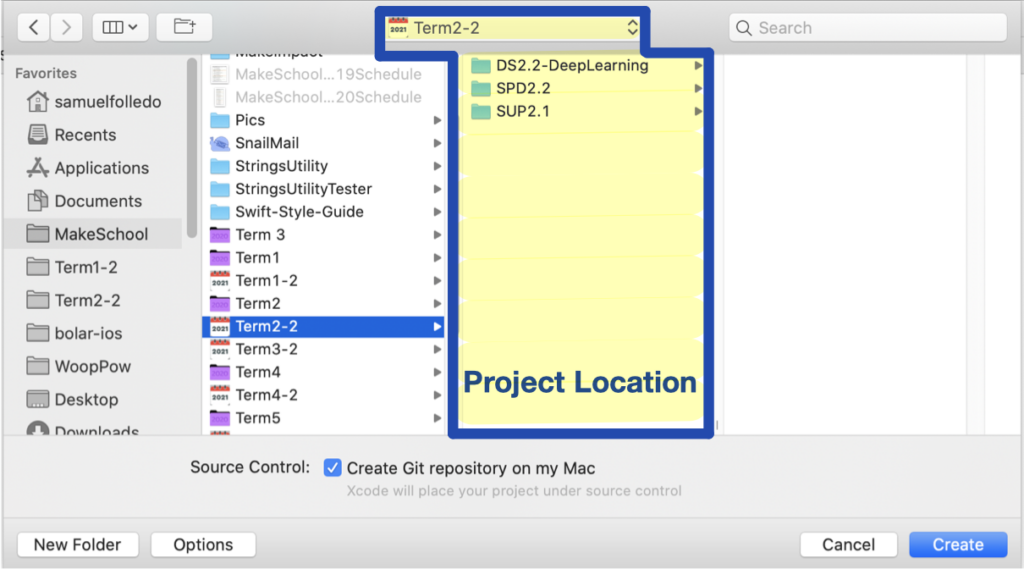
Step 3:- Choose your project options
Once you click on Create new Xcode Project, you will navigate to a new screen which has the below options:-
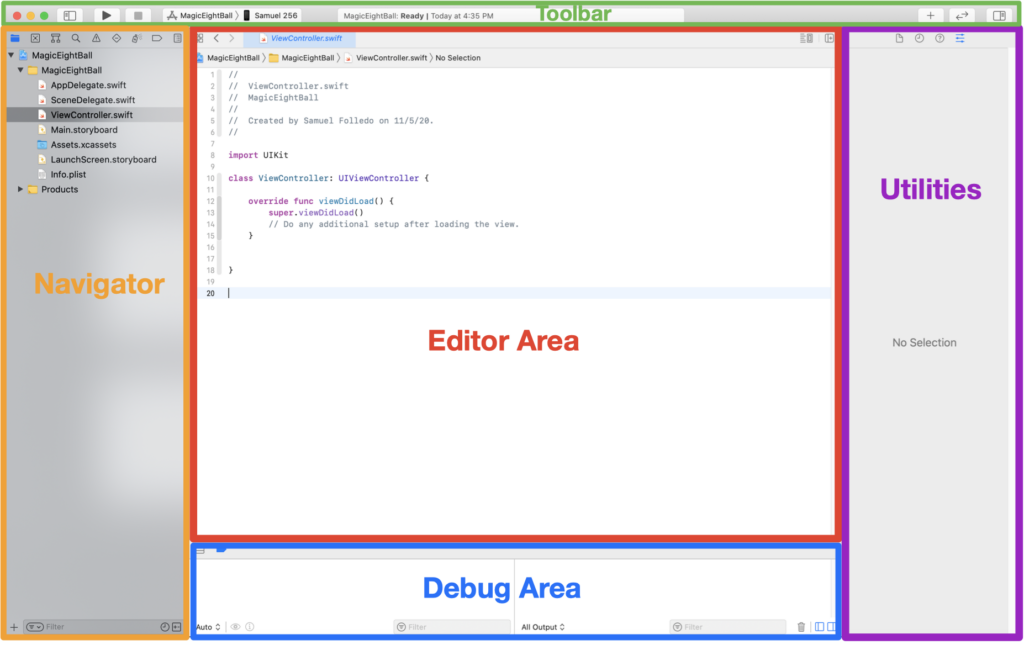
Step 4:- Design Your App
Once we create the Project, We can see the below screen, and we can start designing our app by Using the Editor Area
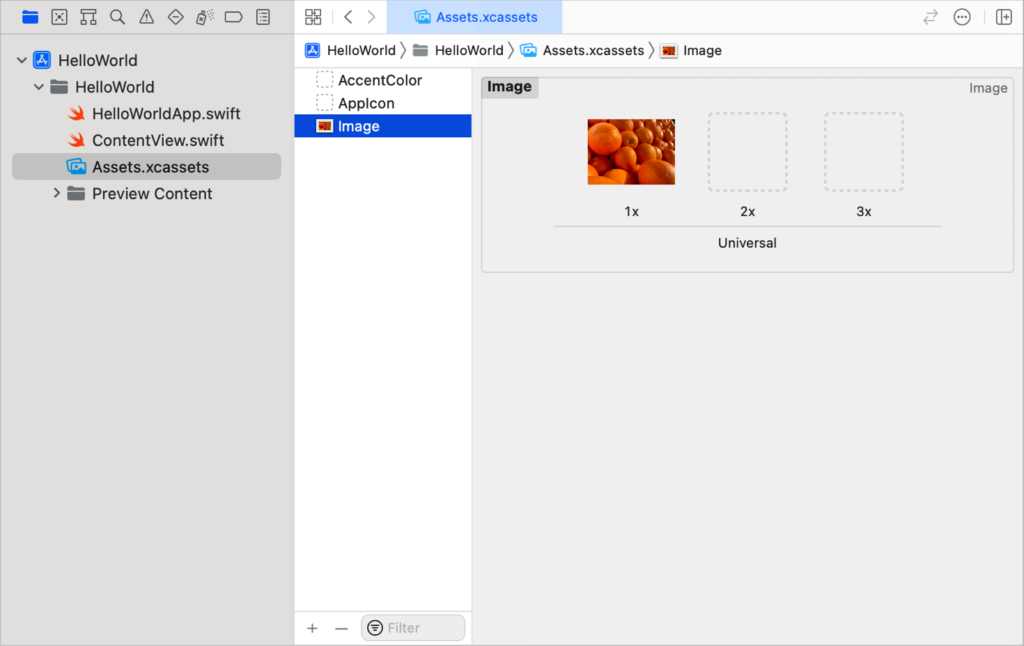
Step 5:- Add Resources and Assets
If you want to add any resources and Assets to the Project, go to the navigator area and click Assets—xcassets folder.
Step 6:- Test Your App
We can test our app by building and running the app, and also we can perform unit testing by using Apple’s Framework (XCTest)
Note:- For building and running the app, press command + R
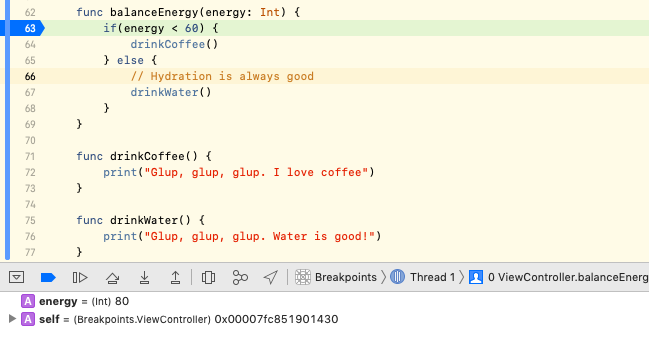
Step 7:- Debug Your App
We can debug our app by using Breakpoint
Using BreakPoint:- Breakpoints in Xcode make it possible to pause your app when you’re running the debugger. This allows you to inspect different variables while trying to isolate and locate bugs, crashes, and other errors. Adding a breakpoint in Xcode is easy. Just navigate to the line within your code where you want the execution to pause.
Step 8:- Publish your App
For Publishing our app into App Store Connect, we need to consider the following things: –
- Assemble App Information like Screenshots, name, and demo account.
- Create a Bundle Identifier
- Create A Certificate Signing Request
- Create An App Store Production Certificate
- Create A Production Provisioning Profile
- Create Build:- Select any iOS Device -> Click on Product -> Archive
- Upload it into TestFlight
- Once the Build is uploaded on TestFlight, we can submit that Build for Review
- Once the Build gets reviewed by Apple, we can release that Build on TestFlight.
What are the stages of iOS App Development?
The iOS app development process typically involves several stages, from conception to deployment. Here are the critical stages of iOS app development:-
- Requirement Gathering & Design:- Before launching an app, it is essential to focus on what challenges the mobile app solves, who is the target audience, what features to include, and so on. Besides, it is essential to conduct comprehensive market research to ensure the app is competitive in its market or market niche. The planning phase also includes arranging all the requirements needed in the subsequent phases of the app development process.
- Development:- In the Development phase, Developers write code to implement the app’s functionality, incorporating the planned features and UI design.
- Testing:- After finishing all technical app development phases, the next step is the QA testing of the developed product. Testing or reviewing the app for iOS is a crucial step, considering the difficulties in the submission process and Apple’s approval.
- Deployment:- Once we are done with the testing, our app is ready to be deployed on App Store Connect. We must create a build by archiving it and uploading it into the test flight (App Store Connect).
What is iOS App Testing?
iOS app testing is the procedure for testing an iOS application on Apple devices(iPhone and iPad). The central perspective of this process is to evaluate whether the app works as expected for specific user actions and under different hardware and software configurations. It is essential to test the app for different testing scenarios; we can perform the following testing: –
- Unit Testing:- When we are talking about Unit tests, they are automated tests that run and validate a piece of code (known as the “unit”) to ensure it behaves as intended and meets its design. Unit tests have their target in Xcode and are written using the XCTest framework. A subclass of XCTestCase contains test methods to run in which only the methods starting with “test” will be parsed by Xcode and available to run.
- UI Testing:- UI testing refers to testing the user interface and interacting with the elements on the screen using tests. It will help you ensure and validate that the UI part of the app works as expected and spot any regressions due to changes in UI-related code. Apple provides us with a native framework called XCTest for UI testing. It relies on the data that accessibility technology uses to interact with the screen.
Working with this data is similar to writing unit tests. You create UI test classes by subclassing XCTestCase and adding your UI test methods. Using this method, you write code to interact with elements and use assertions to validate the expected result.
iOS App Deployment
Assemble App Information like Screenshots, name, and demo account.
Create and Add Bundle Identifier:- The bundle identifier is the name of your app, as seen by both the App Store and iOS devices.
- In your browser, navigate to Apple’s Developer Portal
- Log in
- Click Identifiers
- Click the “+” in the top right of the screen
- Name the App ID the same as your app
- Ensure the Bundle ID follows the standard naming convention: com. your company name. your app name
- Check any App Services the app needs, click Continue
- Verify the services are correct, then click Submit
Create a Development and Distribution Certificate.
Creating Provisioning Profile:- Provisioning Profiles are packaged with iOS apps so users’ devices can install them.
- In your browser, navigate to Apple’s Developer Portal
- Log in
- Click Provisioning Profiles
- Click the “+” in the top right of the screen
- Click the App Store Distribution option, click Continue
- Select the Bundle ID created earlier, click Continue
- Select the Certificate created earlier, click Continue
- Make sure the Profile Name follows the standard naming convention: App Name App Store Distribution
- Click Generate
- Download it
- Install the provisioning profile on your computer by double-clicking
- Keep this file somewhere safe
Create an App in the App Store Connect
Make a Release Build:-
Package the binary that users will upload to the store.
- Start Xcode
- Open the Project or workspace
- Update the version and build numbers
- Open Build Settings
- Make sure All settings are selected
- Scroll to Code Signing
- Use the provisioning profile created earlier
- Use the code signing identity created earlier
- In the top menu, select Generic iOS Device as the build destination if no actual device is connected
- Menu, Project, Archive
- Click Distribute
- Sign in as your Apple developer account
- Submit to the app store
- Wait for the confirmation
Submit the version for Review.
The Apple team must review every app submitted to the store before release.
- Select the release type.
- Manual release – After the app is accepted, a Release button will appear
- Automatic release – as soon as the app is accepted, it will be released.
- Wait for approval
- This process usually takes 2-3 weeks for a new submission.
- If your app was not approved, review the notes in the Resolution Center and, make any necessary changes to the app or version information, then resubmit.
Release your App
- If you selected Manual release, click Release your app when ready
- Wait for the green “Ready for Sale” version status (This might take from 1 hour to 1 day after release)
- Search for your app on the App Store
Conclusion
So Here we learn about how to make an iOS app iOS app development involves a series of stages and considerations to create a successful and engaging app for the iOS platform. We discussed various aspects of iOS app development, including the tools required, basic requirements, environment setup, app architecture, design and development guidelines, and publishing an iOS app.
By learning iOS app development best practices, design principles, and guidelines provided by Apple, developers can create high-quality iOS apps that deliver users a seamless and delightful experience. In addition, iOS app development offers tremendous opportunities to reach a vast user base and contribute to the thriving ecosystem of iOS apps.
Frequently Asked Questions
When we are talking about building an iOS app on Windows, it is possible by adapting different tools, which we will discuss but not officially possible by Apple. The major problem is Apple’s Xcode (Integrated Development Environment) which is only available on macOS. Using the following ways, we can build an iOS App on Windows but not upload it to the App Store.
a. Use Virtualbox and Install Mac OS on Your Windows PC –
- A copy of OS X as a virtual image file or an installer.
- A virtual machine tool like VirtualBox or VMWare.
b. Rent a Mac in the Cloud –
- A considerably more straightforward approach to get your hands on OS X is to lease a Mac in the Cloud, although it will be much more expensive.
- Services like Mac-in-Cloud and Mac-Stadium offer affordable rent-a-Mac products.
c. Build Your Own “Hackintosh”
- A Hackintosh is a PC that runs Mac OS. It is the same as installing an OS X on a Virtual machine. Likewise, you can install OS X as a bootable OS to your PC.
No, Xcode and Swift are not the same. Both the products of Apple has different purposes.
It is subjective and can vary depending on various factors, including individual experience, familiarity with the platform, and specific project requirements. Here are some considerations regarding the difficulty of iOS and Android development:
Programming Languages: iOS development primarily uses Swift and Objective-C, while Android development uses Java or Kotlin. The learning curve for Swift and Kotlin is often easier than Objective-C and Java, respectively. Swift, in particular, is known for its modern syntax and developer-friendly features.
Market Considerations: If your target audience is primarily iOS users, focusing on iOS development may be more advantageous. Conversely, Android development may be a priority if your target audience is predominantly on Android devices.
Ultimately, the choice between iOS and Android development should be based on your target audience, project requirements, available resources, and personal preferences or expertise.


