Angular Best Practices: Tips for Project Structure and Organization

When we start building a new project from scratch, the first question is, What should a good project architecture look like? No matter what tech stack it is, we all know a Project Architecture is the building block of the project while building a new application.
Finding the best suitable architecture for every project and use case is almost impossible, but we should find a scalable structure. This article proposes Angular best practices for a scalable and maintainable Angular project structure in detail.
Overall Project Structure
Basically, a good Project Architecture will not improve your application’s performance or make it run faster or better. However, with the help of angular best practices in architecture, we can quickly navigate to source files and understand where everything is kept. This will then be helpful to achieve easy debugging and minimize a developer’s or newcomers’ efforts to wander here and there to search for a file.
As angular project structure best practices, the Angular team introduces the LIFT principle as follows:
- Locate code quickly – Keep related files in a group that will be easy to find.
- Identify the code at a glance – Name the file to know what it contains and represents instantly.
- Flat folder structure – Keep a flat folder structure as long as possible, where everything is available in a single dimension.
- Try to be DRY – Do follow DRY (Don’t Repeat Yourself), but avoid being so DRY that you sacrifice readability.
The initial Angular Structure looks like this, created using the Angular CLI command.
Angular Best Practices: Tips for Project Structure and Organization
Let’s understand the overall project structure. It generally contains workspace configuration files, application project files, and source files.
.vscode – The folder was created and replaced with e2e by the Visual Studio Code when the codebase was opened in the VS Code editor. It holds your project workspace settings.
node_modules/ – Provides npm packages to the entire workspace. We can open the folder and see the packages available.
Src/ – Contains all of the application’s code.
.editorconfig – Holds configuration for code editors.
.gitignore – Specifies intentionally untracked files that Git should ignore.
angular.json – Holds your angular app configuration.
package-lock.json – Records the exact version of every installed dependency, including its sub-dependencies and their versions.
package.json – Contains descriptive and functional metadata about a project, such as a name, version, and dependencies.
README.md – A Markdown file for documentation of the application.
tsconfig.app.json – It’s just an additional config file that allows you to adjust your configuration on an app basis. It is useful when we have multiple apps in the same Angular CLI workspace.
tsconfig.json – A general file that contains general typescript configuration. It’s beneficial where there are multiple Angular subprojects, each with its tsconfig.app.json configuration.
tsconfig.spec.json – It holds the TypeScript configuration for the application tests.
Directory Structure
Let’s discuss the Directory structure, the need, and the use of each directory in detail. We can organize files based on their functionality and purpose with the directory structure.
node_modules
The node_modules is a directory for building tools. The package.json file in the app defines what libraries will be installed into node_modules when you run npm install. Whenever you install third-party packages, the node_modules directory will store their folders.
Note: When deploying your application to the production server or committing to the git repository, you should omit node_modules. If you are migrating your project to another location, you should also not include this folder; instead, run npm, which will create node_modules for you.
SRC
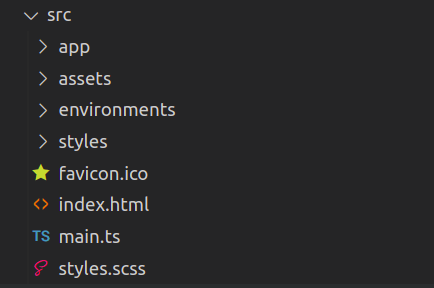
This is where we need to put all our application’s source code. When we create an angular application, by default, angular CLI creates several files and directories in the src directory. We must also put every Module, component, service, and related source code in the src directory.
App
The app directory functions as a root application folder, serving as an app module. The app module is also located inside the src directory. An angular application should have at least one component and one Module; by default, it is an app module.
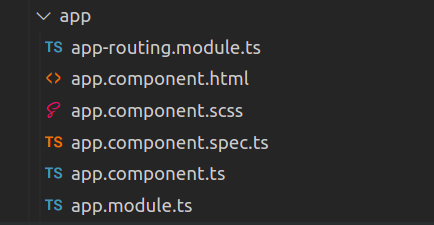
The app module contains its module file (app.module.ts), routing file (app-routing.module.ts), and component (app.component.ts).
app.module.ts – It tells Angular about other specific Angular modules. This file includes Imports, Declaration, Providers, Bootstraps, and other configuration options. We import another module in the Imports section, declare any components in your Declarations, and provide services in the Providers section.
app-routing.module.ts – To declare a list of routes and their respective components for their routing.
We will be discussing the remaining component files in the upcoming section.
Assets
In the assets, we store static data required for the application, like images, icons, etc.

Environments
We should create this directory to set up different environments. There, we can add environment files to store environment-specific configurations, for example:

environment.prod.ts for production environment.
Environment for the development environment.
Styles
Placing the shared CSS files in the styles directory is a good idea. We should add our custom CSS file (like a file for color variables, shared typography, etc.), to use in the overall application.

Module Organization
Angular Module is a concept that groups the related features and organizes them; each Module represents a discrete and independent function. The initial base of the Angular application has only one single Module, known as the app module, which works great in the case of small applications. Angular Modules give us an excellent starting point for organizing the directory structure.
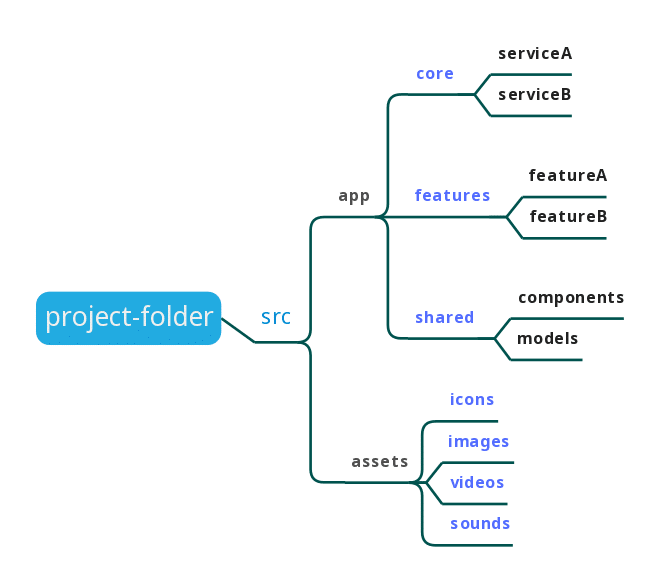
We can create a well-organized application by following angular modules’ best practices. As a good practice, we should bundle code into modules, and to make the best use of modules, we specify modules into four categories below.
- App Module
- Core Module
- Features Module
- Shared Module
App Module
The app module is the root module created by angular CLI, which is an entry point of the application. As the application starts, it loads the app module, which also loads all other modules. As the application grows, we evolve the root module. The app module contains all other modules: core, features, and shared.
Angular Best Practices: Tips for Project Structure and Organization
Core Module
The core functions, services, and models shared globally across the application and didn’t have any relation to the feature module must be a part of the core module.
The singleton services should be implemented here that have to have one and only one instance per application. The Module contains an Authentication service and static components like the header, footer, navbar, sidebar, interceptors, guard, constants, enums, utils, and universal models.
One must import the core module only in the app root module. Other modules must not import the core module.
Shared Module
The components, directives, and pipes shared across various modules should be kept in a shared module. For example, search and loaders could be used across multiple features. The items stored in a shared module will be re-used and referenced by the components declared in other feature modules.
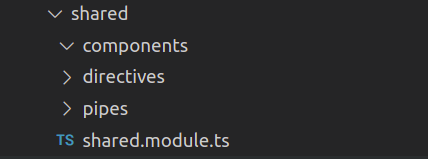
A Shared Module is more beneficial while working on large applications where we consider lazy loading of the application to increase the performance and decrease the bundle size of the application and initial build-time. The shared Module should not depend on any other module in the application.
Note: You must not define the services here. Since the shared modules are imported everywhere, it may create a new instance of the service if imported in the lazy-loaded modules.
Features Module
We split application requirements and break down the application into features, which are called Feature Based Architectures. We should create a separate sub-module for every feature under src/app/features/ module. This makes your code independent, with a single responsibility focused on specific features.
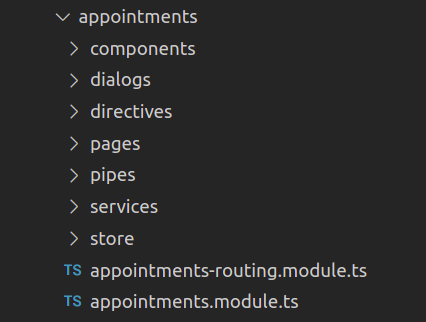
Suppose we are building a healthcare application. We must have features for appointments, prescriptions, patients, payments, etc.
Feature Based Architecture
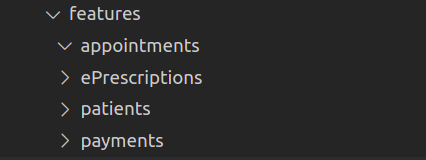
Each Module should name its folder after the Module Name or Feature. Each Module has components, directives, pipes, pages, dialogs, and services required by the Module and a store in case you use a Redux pattern, creating each as a block.
Structuring the code this way makes things easier to locate and increases the reusability of code. Modules are a way of organizing and separating your code. You can have multiple modules and lazy load some modules.
Component Structure
Components are essential in the creation of Angular apps. They divide a huge application into pieces of code that define a view for the user. Components result in more modular and easy-to-maintain applications. Due to their reusable and layered architecture, angular components give developers a sophisticated user interface.
Why Component Structure?
- It simplifies the application architecture.
- Ensures component reusability.
- Enhances overall application performance.
- It makes it easy to do debugging and error handling.
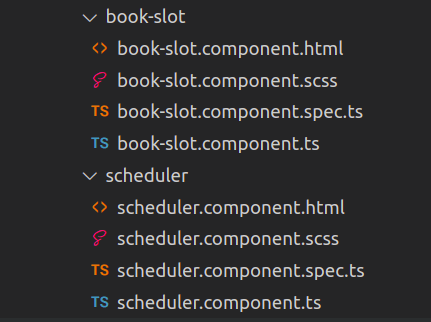
Each component consists of a TypeScript class, an HTML template, a CSS stylesheet, and optionally a spec file.
Component file
Each component contains a TypeScript(.ts) file defining a component class. It contains data and logic related to the component, where data is stored into properties and logic is implemented through methods. This Component class is bound to an HTML template using Data Binding.
Template file
The Templates define the view of the Components. The organization of views is hierarchical, allowing modification or hiding and showing UI sections and pages.
CSS file
To style the template one can use the CSS style sheet file.
Spec file
A spec.ts file is a testing specification file that includes the test cases for the respective component.
The group of files mentioned above creates a component that generally defines a part of the user interface (UI) and holds the application logic and data.
For the scalable application, we must consider Component Architecture as well. There should be two types of specialized components: Dumb and Smart.
Dumb Components
Dumb or Presentational components are explicitly used to represent UI and do not communicate with services or don’t include business logic.
These components depend on the Smart components and communicate with the @Input() and @Output() decorators to get the data and emit the events depending upon the requirements.
Smart Components
Intelligent components include:
- Business logic.
- Communicating with the services to fetch data.
- Handling storage to keep track of the state.
- Sending data to Dumb components.
The Smart and Dumb components are the architecture where we have separated the business logic and presentation codes between smart and dumb components. This allows one component to handle all the business logic and data tracking; the other helps display the data flawlessly.
Services and Dependency Injection
As previously discussed, Smart components are smart enough to care about how the application works, but too many responsibilities in a single component can complicate the component. In the future, we need the same logic for other application features.
Copy-pasting such logic is a poor practice that increases code duplication and troubles our easy-to-maintain principle. To tackle this issue, Angular introduces the concept of Services and Dependency Injection.
Services are the classes that provide shared functionality across the components. Services encapsulate data manipulation, business logic, and communication with the backend server. We can implement the methods for repetitive code across the application and use this service in the component to get that logic to work in the same way. The component accessing the services is done through Dependency Injection.
Angular services should also follow the angular API best practices where services take care of the API integration to fetch data from the server. As an angular API best practice, the services interacting with the server can be kept separate from those acting as a helper for components. This makes it easy for the developers to make API-related changes if there’s a change from the backend, which also needs to be reflected from the frontend side.
As component architecture matters while deciding the project architecture, we should also look into where a service should be placed and from where to access it. The services that are Module-related and have no use in other modules should be created in the respective module directory. The services that are shared across the application (like Snackbar Service Logger Service) should be added to the core module.
Naming Conventions and File Structure
Unknowingly, Naming conventions and File Structures play an important role in Project Architecture for maintainability and readability.
To understand the importance of Naming conventions and File Structure, you have an excellent Project Architecture, but your naming convention is apt.sl.component.ts. What is this file for? It needs to be easier to understand the purpose of the file or component. If we rename appointment-slot.component.ts, now from the name itself, it must have the code or logic for appointment slots.
Let’s see the naming conventions that one must follow during development:
- Apply the Single Responsibility Principle to all components.
- File names should be meaningful and descriptive.
- Use dashes to separate words in the descriptive name and dots to separate the descriptive name of the file type.
Don’ts: dateFormatter.pipe.ts or Date.formatter.pipe.ts
Dos: date-formatter.pipe.ts
- For your components, you should always use dash-delimited selectors like files and ensure they contain the appropriate app prefix.
Don’t’s: <appappointmentslot>
Dos: <app-appointmentslot>
- All types of classes should have a good suffix.
Example:
Service class should end with the term Service.

Module class should end with the term Module.

- Use upper camel case for class names. example: SearchBarComponent
- Simplify and group similar Imports.
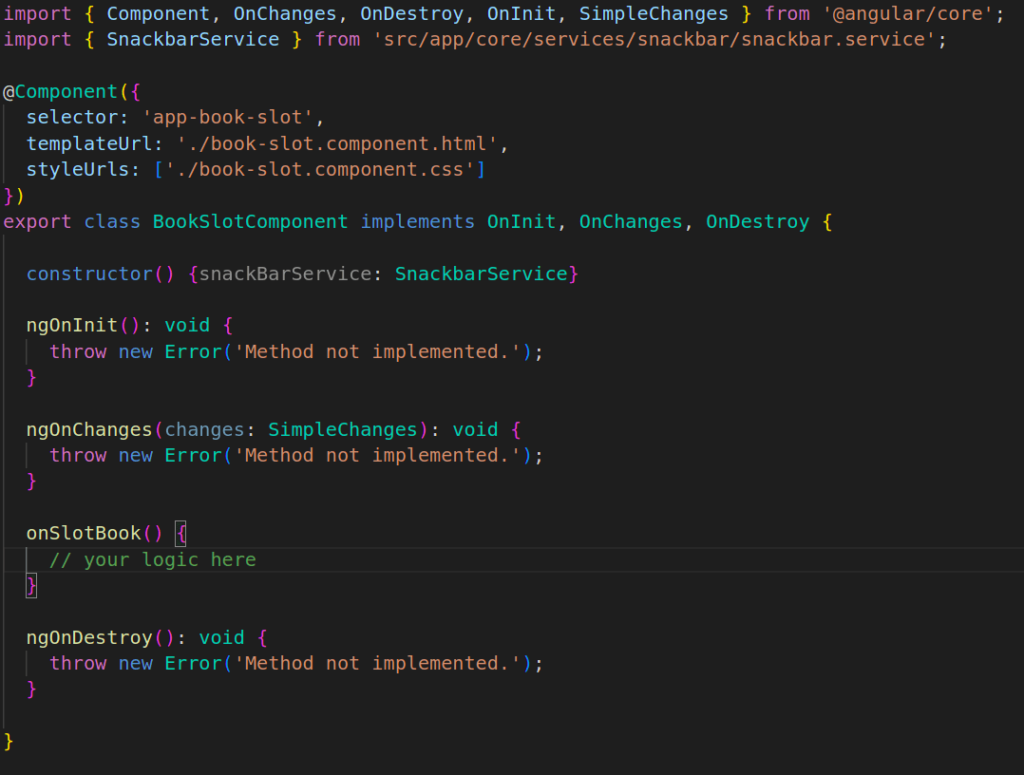
- Write Lifecycle hooks in order. Don’t write ngOnDestroy() at the end and ngOnInit() at the middle of the component. It should be like
Conclusion
In conclusion, choosing an appropriate Project structure that suits the application is up to the project requirements. The discussed Project Architecture and following the angular best practices will help build scalable and maintainable applications and code readability. It will then benefit the new Developer to onboard quickly and get up to speed. Also, the application will play nicely with other Angular dependencies and third-party components.
Frequently Asked Questions
A component should follow the Single Responsibility Principle and avoid creating multiple classes and components in the file. Avoid code duplication by using the concept of Services. Align with the DRY (Don’t Repeat Yourself) principle and create reusable components and directives. Keep the data, logic, and representation separated using Smart and Dumb components. Give good names to your components, which help in increasing code readability. Lazy load your modules to improve application performance.
The best project architecture should always be like the one that increases the application performance, is easy to understand, and gets on to work for the newly onboarded developer. When the project is scaling on a significant level, it should not scale the complexities of the project. A good Project Architecture reduces the complexity and scales the application whenever needed. It should keep code organized, which makes navigating and modifying the codebase easier.
To improve the performance of the Angular application, change detection, lazy loading, etc., help to improve the performance of the Angular application. The modules not required to be loaded at once by the client should be lazy loaded. It reduces the bundle size of the application and decreases the load time. Change detection tells Angular not to check each component every time any change detection occurs, which results in performance improvement of the Angular application.
When creating large applications, Angular is a better choice for single-page applications, which come with various services, controls, views, directories, and modules that make the developer’s job easier. It enhances interactive mechanisms; the developers can easily create dynamic web pages with instantly updated content.


Hi everybody, here every one is sharing such familiarity, so it’s nice to read this
website, and I used to go to see this webpage everyday.
I every time emailed this weblog post page to all my
associates, since if like to read it after that my links will
too.
Amazing! Its actually remarkable piece of writing, I have got
much clear idea about from this article.
I have fun with, lead to I found just what I was having a look for.
You’ve ended my 4 day long hunt! God Bless you man. Have a great day.
Bye
Hello, constantly i used to check blog posts here in the early hours in the break of day, for the reason that i
like to find out more and more.
Keep this going please, great job!
Excellent web site you have got here.. It’s hard to find excellent writing like yours nowadays.
I truly appreciate individuals like you!
Take care!!
When someone writes an article he/she maintains the idea of a
user in his/her brain that how a user can be aware of it.
So that’s why this piece of writing is perfect. Thanks!
I’ve read several excellent stuff here. Definitely value bookmarking for revisiting.
I wonder how a lot attempt you put to create one of these great informative website.
An interesting discussion is definitely worth comment.
I believe that you should publish more on this issue, it might not be a taboo subject but typically folks don’t speak about these subjects.
To the next! All the best!!
Useful info. Fortunate me I discovered your website accidentally, and I am surprised why this coincidence
did not happened earlier! I bookmarked it.
It’s hard to find knowledgeable people on this subject, however,
you sound like you know what you’re talking about! Thanks
That is a very good tip especially to those
new to the blogosphere. Brief but very precise information… Thanks for
sharing this one. A must read article!
Wow, that’s what I was looking for, what a stuff! existing here at this website, thanks admin of this web page.
This is my first time pay a visit at here and i am really impressed to read all at alone place.
My brother recommended I might like this blog. He was totally right.
This post truly made my day. You cann’t imagine just how much time
I had spent for this info! Thanks!
Good post. I learn something new and challenging on websites I stumbleupon everyday.
It will always be exciting to read through content from other
writers and use a little something from other sites.
Hello! I could have sworn I’ve been to this website before but after reading through some of the post I realized it’s new to me.
Anyhow, I’m definitely delighted I found it and I’ll be bookmarking and checking
back frequently!
Very informative blog article.Thanks Again. Want more.