Microservices with NodeJs Using NestJs Part 1
Introduction
Creating new server-side applications with node js requires a lot of dynamic programming where application size grows bigger and bigger over the period. Introducing new features and fixing the bugs in existing applications gets tedious over the period. To meet the business needs for growing applications becomes challenging to tackle. Introducing new members/developers to grow faster often risks unintentionally manipulating existing functionality. A better approach is to split your applications into small modules. This is where microservices come into the picture.
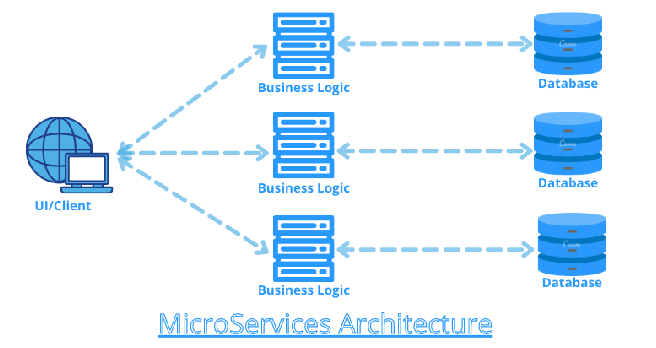
What are microservices?
Microservices is an architecture(service-oriented architecture) (SOA). In this architecture, applications are broken down into various services. The motivation behind this is separation and modularity.
Microservices are more beneficial.
Specifying all business logic into a single software module.
A few Advantages of microservices are
- Increases scalability
- More flexibility
- Modular architecture
- Ease of introducing new features
- More reliable and robust structure
Why NodeJs for microservices?
Highly enriched runtime with various javascript modules, Node JS based on single-threaded architecture works with event loop with non-blocking io. Event-driven architecture and high scalability make it an excellent choice for microservices architecture.
Why Node + NestJs for microservices?
Nest (NestJS) is a framework for building efficient, scalable Node JS server-side applications. It uses progressive JavaScript. It is built with and fully supports TypeScript.
NestJS is like Angular framework.
Nest Js Overview
If you’re not familiar with Node JS, you can always visit the official site NestJS Docs for more information.
Let’s get our hands dirty and jump into code.
Install Nest JS CLI.
$ npm i -g @nestjs/cli
We’ll create two nest js projects using Nest JS CLI to understand microservices architecture. Create a directory in your system.
$ nest new micro-server
Nest JS Cli asks you to use the package manager for your application. You can choose any of your choices, for this tutorial we’ll choose yarn.
Nest JS CLI automatically sets up the base structure for you. You can use the command.
$ yarn start:dev
To test the application. You can head over to the browser.
This is a simple REST API implementation demo application.
Converting to Micro services
Now we’ll convert those monolithic applications into microservices. For same, supported transports in Nest JS are
- Basic TCP (Direct Communication)
- Redis (Message Broker)
- MQIT (Message Broker)
- NATS (Message Broker)
- RabbitMQ (Message Broker)
- gRPC (Remote Procedure Call)
As above, you can see, available transports are categorized into three categories as Direct Communication, Message Broker and Remote Procedure Call.
TCP transport
We’ll focus on Direct Communication. TCP transport. In that, we’ll cover Event-based and Message Pattern communication.
Let’s start with event-driven communication. For the same, we’ll set up our server first. Open the code editor of your choice and install nest js microservices dependency as follows.
Event Driven Communication
$ yarn add @nestjs/microservices
Make the following changes to your `
main.ts
file. https://medium.com/media/3bae8717d21c083e3cc40a23052abd8a
import { NestFactory } from '@nestjs/core';
import { AppModule } from './app.module';
import { MicroserviceOptions, Transport } from '@nestjs/microservices';
// Create microservice config options
const microserviceOptions : MicroserviceOptions = {
transport: Transport.TCP,
options: {
host: '127.0.0.1',
port: 3000
},
};
async function bootstrap() {
const app = await NestFactory.createMicroservice<MicroserviceOptions>(
AppModule,
microserviceOptions
);
await app.listen();
}
bootstrap();
In the above changes, we created a microservice and used TCP as a transporter. To create a microservice in Nest, we can pass options as a second param, which contains the host and port you want to expose to run your microservice.
Change your app.controller.ts as
import { Controller, Get } from '@nestjs/common';
import { EventPattern } from '@nestjs/microservices';
import { AppService } from './app.service';
@Controller()
export class AppController {
constructor(private readonly appService: AppService) {}
@EventPattern('log_message')
async handleMessagePrinted(data: Record<string, unknown>) {
this.appService.logMessage(data.text)
}
}
Here, we’ve replaced the Rest API implementation with an event pattern. Our service will listen to any event named ‘log_message’ and log messages from that event into the console.
Change your app.service.ts as
import { Injectable, Logger } from '@nestjs/common';
const logger = new Logger('ServerAppService');
@Injectable()
export class AppService {
logMessage(message): void {
logger.log(message);
}
}
Here, we log that message to the console in the micro-server application. We have created a logger instance to log messages
And we’re all set, we have configured microservice. Create a client to communicate with it let’s start. We’ll create a new nest js application and convert it to a client. Go back to the parent directory.
$ nest new micro-client
Nest JS will create a new application for you, let’s add a microservices library to it.
$ yarn add @nestjs/microservices
Make changes to your app.controller.ts as follows in the new client app
import { Controller, Get, Inject, Logger } from '@nestjs/common';
import { ClientProxy } from '@nestjs/microservices';
const logger  = new Logger("ClientAppController");
@Controller()
export class AppController {
constructor(@Inject('LOGGER_SERVICE') private readonly client:   ClientProxy) { }
async onApplicationBootstrap() {
await this.client.connect();
}
@Get()
emitMessage() {
logger.log("In Microservice Client");
this.client.emit<any>('log_message', {text : 'Service Communicating'});
}
}
Here, we use the ClientProxy service in our controller to emit an event with a message. We’ll be registering that service in main.ts
Make changes to your app.module.ts as follows in the new client app
import { Module } from '@nestjs/common';
import { AppController } from './app.controller';
import { Transport, ClientsModule } from '@nestjs/microservices';
@Module({
imports: [
ClientsModule.register([
{ name: 'LOGGER_SERVICE', transport: Transport.TCP },
]),
],
controllers: [AppController],
providers: [],
})
export class AppModule {}
In AppModule, we register the client for our service and set transport like TCP.
And that’s it, you’re ready to test your first microservice application.
Don’t forget to run your microservice server and client app. Go into both directories, micro-server, micro-client.
$ yarn install
$ yarn start:dev
You can head over to the browser. Type ‘localhost’ to test the application. You can see the magic. You’ll see the message ‘Service Communicating’ we are sending from the client, which will be printed in the micro-server application console. Client can communicate with the microservice we have developed.
Checkout out github repo for help
If you’re not able to figure where you have to make code changes. To get both applications running. You can head over to github and see code changes over there.
This communication is one way to send messages from client to service. Not to get any response back.
This type of implementation is useful in logging messages to servers and similar applications.
For getting responses back, we can use the Message pattern, for that we need to make simple code changes as above, you can get the application code base here. github
I hope this article gives you exposure to microservices and helps you create your first microservice application.
In Part 2, we’ll explore Microservices communication via message broker and we’ll use Redis as a message broker and its advantages over other message brokers.
Thanks for reading, we’ll continue in PART-2 🙂
To learn microservices along with Redis, please visit Microservices with NodeJs Using NestJs RedisOverviewmedium.com
For any questions and inquiries, visit us at thinkitive


I was excited to discover this website. I want to to thank you for your time for this wonderful read!! I definitely liked every part of it and i also have you book-marked to look at new things on your website.
I agree with your point of view, your article has given me a lot of help and benefited me a lot. Thanks. Hope you continue to write such excellent articles.
This article opened my eyes, I can feel your mood, your thoughts, it seems very wonderful. I hope to see more articles like this. thanks for sharing.