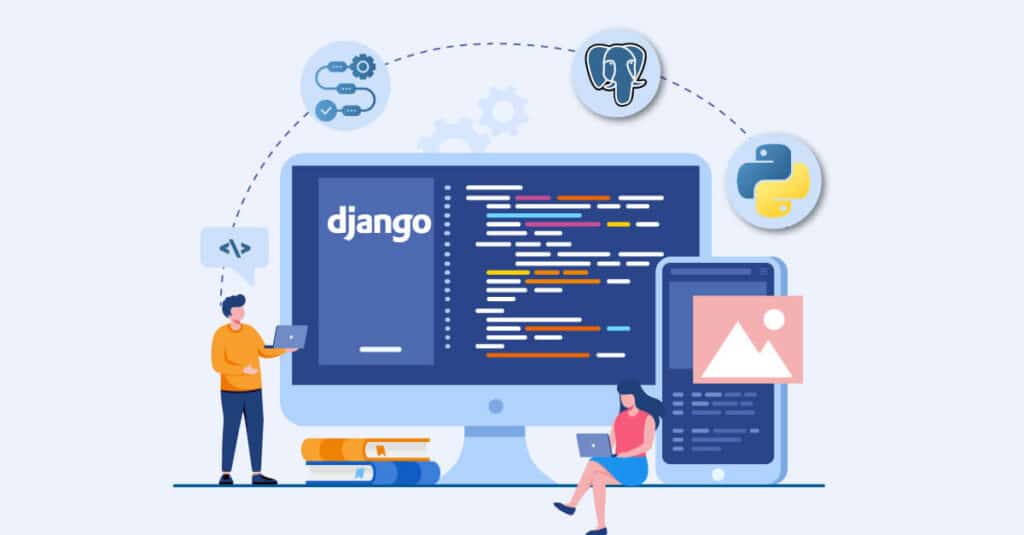
How to Build Multi Tenants application with Django, Django Rest Framework and Django Tenant
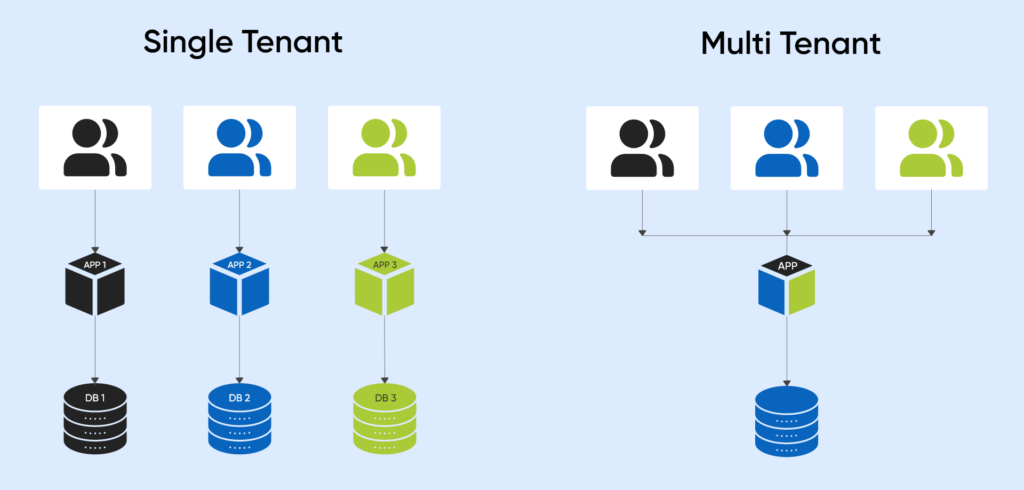
What is Multi Tenants Application
In multi-tenant software architecture (also called software multi-tenancy), a single instance of a software application (and its underlying database and hardware) serves multiple tenants (or user accounts). A tenant can be an individual user, but more frequently, it’s a group of users (such as a customer organization) that shares common access to and privileges within the application instance. Each Tenant’s data is isolated from, and invisible to, the other tenants sharing the application instance, ensuring data security and privacy for all tenants.
Types of Multi Tenants Modeling
- Instance Replication Modeling:- In this modeling, we system spins a new instance for every Tenant. This is easier to start but hard to scale. It becomes challenging when there are more tenants. It’s similar to single-tenant architecture.
- Database Segregation Modeling:- In this modeling, we do separate databases for each Tenant to store their data in a specific database. Again this will become hard to handle databases when there is an increase in tenants.
- Schema Segregation Modeling:- In this modeling, we use a single database and a single instance of an application. When we create a new tenant, then create a new schema in that database for this Tenant to store their data separately.
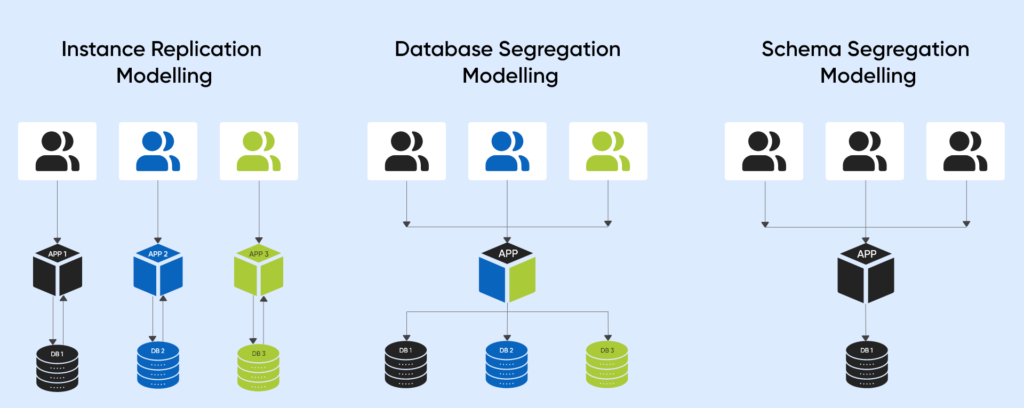
Note:- In this blog, we will use Schema Segregation Modeling.
Why do we use multi-tenant applications?
Let’s take an example of the Healthcare Domain. In this domain, every client wants to separate and isolate their data from each other. The data in the Healthcare domain is susceptible to patients, so clients want to separate it. In the multi-tenant application, we separate the database or schema so that data will separate. So due to data-related compliance of clients, we are using a multi-tenant application.
What are Schemas?
Generally, a schema can be seen as a directory in an operating system, each directory (schema) with its own set of files (tables and objects). This allows the same table name and objects to be used in different schemas without conflict.
A database contains one or more named schemas, which in turn contain tables. Schemas also contain other named objects, including data types, functions, and operators. The same object name can be used in different schemas without conflict; for example, schema1 and my schema can contain tables named mytable. Unlike databases, schemas are not rigidly separated: a user can access objects in any schemas in the database they are connected to if they have the privileges to do so.
There are several reasons why one might want to use schemas:
- To allow many users to use one database without interfering with each other.
- Organize database objects into logical groups to make them more manageable.
- Third-party applications can be put into separate schemas so they do not collide with the names of other objects.
Schemas are analogous to directories at the operating system level, except that schemas cannot be nested.
For More Information:- https://www.postgresql.org/docs/14/ddl-schemas.html
Requirements
- Python (v3.10) – https://www.python.org/
- PostgreSQL (v14) – https://www.postgresql.org/
- Django (v4.0) – https://www.djangoproject.com/
- Django Rest Framework (v3.14.0) – https://www.django-rest-framework.org/
- Django Tenants (v3.5.0) – https://django-tenants.readthedocs.io/en/latest/
- Python – Python is an easy-to-learn, powerful programming language. It has efficient high-level data structures and a simple but effective approach to object-oriented programming.
- PostgreSQL – PostgreSQL is a powerful, open-source object-relational database system for persisting data.
- Django – Django is a high-level Python web framework encouraging rapid development and clean, pragmatic design. Built by experienced developers, it takes care of the hassle of web development, so you can focus on writing your app without reinventing the wheel. It’s free and open source.
Installation:- pip install Django==4.0
- Django Rest Framework – Django REST framework is a powerful and flexible toolkit for building Web APIs.
Installation:- pip install djangorestframework==3.14.0
- Django Tenant – Django Tenant is a package; by using this, we will apply multi-tenancy in our application.
Installation:- pip install Django-tenants==3.5.0
Note:- There is a problem in this package that this package currently supports sub-domain-based multi-tenancy. In addition, this may again make it hard to maintain lots of subdomains
But we will modify this package to multi-tenancy using one single domain.
Notes:-
- This application enables Django-powered websites to have multiple tenants via PostgreSQL schemas. A vital feature for every Software-as-a-Service website.
- Django currently provides no simple way to support multiple tenants using the same project instance, even when only the data is different. Because we don’t want you running many copies of your project, you’ll be able to have the following:
- Multiple customers running on the same instance
– Shared and Tenant-Specific data
– Tenant View-Routing (Accept Tenant via Header and then using routing)
Create Multi-Tenancy Application
1. Create a basic Django application
The below command is used to create a Django project with name django_multi_tenancy
Django-admin start project django_multi_tenancy
2. Create an app
The below command is used to create a Django application with the name app
– python manage.py start app
3. Create two model
a. Tenant Model – This model is responsible for storing tenants’ names. You can add more fields if required in your case.
b. Domain Model – This model stores tenants’ domains unique for each Tenant.
From Django.Db import models
from django_tenants.models import DomainMixin, TenantMixin
class Tenant(TenantMixin):
name = models.CharField(max_length=100, unique=True)
#default true, the schema will be automatically created and synced when it is saved
auto_create_schema = True
class Domain(DomainMixin):
Pass
4. Basic Settings
– You’ll have to make the following modifications to your settings.py file.
– This setting is required for application multi-tenancy in application to handle schema-based multi-tenancy.
– Your DATABASE_ENGINE setting needs to be changed to
DATABASES = {
“default”: {
“ENGINE”: “django_tenants.postgresql_backend”,
#..
}
}
5. Add django_tenants.routers.TenantSyncRouter to your DATABASE_ROUTERS setting so that the correct apps can be synced, depending on what’s being synced (shared or Tenant)
This router is responsible for handling routing for a specific tenant. When we change the schema based on the Tenant, then this will handle that situation. We will use routing to switch to a specific tenant schema.
DATABASE_ROUTERS = (
“django_tenants.routers.TenantSyncRouter”,
)
6. Create a middleware.py file and add this code
This is one of the critical files and codes where we will check and verify the Tenant and switch the schema based on the Tenant. When we send the tenant name from Tenant-Header, then in middleware, find that name and validate for the correct tenant name. If this is correct, we change the schema to that specific Tenant. The code below is responsible for this logic.
From django.conf import settings
from django.core.exceptions import DisallowedHost
from django.http import HttpResponseNotFound
from django.db import connection
from django.http import Http404, JsonResponse
from django.urls import set_urlconf
from django.utils.deprecation import MiddlewareMixin
from django_tenants.utils import (
get_public_schema_name,
get_public_schema_urlconf,
get_tenant_types,
has_multi_type_tenants,
remove_www,
)
from app.models import Tenant
class TenantMainMiddleware(MiddlewareMixin):
TENANT_NOT_FOUND_EXCEPTION = Http404
@staticmethod
def hostname_from_request(request):
return remove_www(request.get_host().split(“:”)[0])
def process_request(self, request):
connection.set_schema_to_public()
try:
hostname = self.hostname_from_request(request)
except DisallowedHost:
return HttpResponseNotFound()
#Check the Tenant from headers to change the schema for each request.
tenant_name = request.headers.get(“Tenant-Header”)
try:
tenant = Tenant.objects.get(name__iexact=tenant_name)
except Tenant.DoesNotExist:
if tenant_name != “public”:
return JsonResponse({“detail”: “Tenant not found”}, status=400)
self.no_tenant_found(
request, hostname
) # If no tenant is found, then set to public Tenant and return
return
tenant.domain_url = hostname
request.tenant = tenant
connection.set_tenant(request.tenant)
self.setup_url_routing(request)
def no_tenant_found(self, request, hostname):
if (hasattr(settings, “SHOW_PUBLIC_IF_NO_TENANT_FOUND”) and
settings.SHOW_PUBLIC_IF_NO_TENANT_FOUND):
self.setup_url_routing(request=request, force_public=True)
else:
raise self.TENANT_NOT_FOUND_EXCEPTION(‘No tenant for hostname “%s”‘
% hostname)
@staticmethod
def setup_url_routing(request, force_public=False):
public_schema_name = get_public_schema_name()
if has_multi_type_tenants():
tenant_types = get_tenant_types()
if not hasattr(request, “tenant”) or (
(force_public or request. Tenant.schema_name ==
get_public_schema_name())
and “URLCONF” in tenant_types[public_schema_name]):
request.urlconf = get_public_schema_urlconf()
else:
tenant_type = request. Tenant.get_tenant_type()
request.urlconf = tenant_types[tenant_type][“URLCONF”]set_urlconf(request.urlconf)
else:
#Do we have a public-specific urlconf?
if hasattr(settings, “PUBLIC_SCHEMA_URLCONF”) and (
force_public or request. Tenant.schema_name ==
get_public_schema_name()
):
request.urlconf = settings.PUBLIC_SCHEMA_URLCONF
Note:- Here, we are using public for the default tenant.
7. Add the middleware app.middleware.TenantMainMiddleware to the top of MIDDLEWARE so that each request can be set to use the correct schema.
This code is responsible for adding the above middleware class into the Django application, so when a request comes, then first, this middleware will call and, according to the tenant schema, will be changed.
MIDDLEWARE = (
“app.middleware.TenantMainMiddleware”,
#…
)
8. Add the context processor django.template.context_processors.request context_processors option of TEMPLATES; otherwise, the Tenant will not be available on request.
The code below is responsible for adding a tenant to the request object so that in our request, we can find the Tenant and set the Tenant in the request.
TEMPLATES = [
{
#…
‘OPTIONS’: {
‘context_processors’: [
‘django.template.context_processors.request’,
#…
],
},
},
]
9. Admin Support (for Django Super Admin)
TenantAdminMixin is available to register the tenant model. The mixin disables save and deletes buttons when not in the current or public Tenant (preventing Exceptions).
from django.contrib import admin
from django_tenants.admin import TenantAdminMixin
from app.models import Domain, Tenant
# Register domain model
admin.site.register(Domain)
# Register tenant model
@admin.register(Tenant)
class TenantAdmin(TenantAdminMixin, admin.ModelAdmin):
list_display = (‘name’, )
10. Create one of our use case models
We will create a sample model that will be Tenant-specific and then verify whether or not our implementation multi-tenancy is applied in our application. I will use this model as TENANT APPS.
From django.db import models
class Hotel(models.Model):
name = models.CharField(max_length=255)
location = models.CharField(max_length=255)
description = models.CharField(max_length=255)
picture = models.ImageField()
11. Configure Tenant and Shared Applications
To use shared and tenant-specific applications, there are two settings called SHARED_APPS and TENANT_APPS. SHARED_APPS is a list of strings like INSTALLED_APPS and should contain all apps you want to be synced to the public. However, if SHARED_APPS is set, these are the only apps syncing to your public schema! The same applies to TENANT_APPS, which expects a tuple of strings where each string is an app. If set, only those applications will be synced to all your tenants. Here’s a sample set. THIRD_PARTY_APPS and default django app will add as SHARED_APPS, and our use case model (Like the Hotel model) is TENANT_APPS
THIRD_PART_APPS = [
# Third party apps
]SHARED_APPS = [
‘django_tenants’,
‘django.contrib.contenttypes’,
‘django.contrib.auth’,
‘django.contrib.sessions’,
‘django.contrib.sites’,
‘django.contrib.messages’,
‘django.contrib.admin’,
] + THIRD_PART_APPS
TENANT_APPS = [
# your tenant-specific apps
‘app.Hotel’,
]
INSTALLED_APPS = SHARED_APPS + [app for app in TENANT_APPS if app not in SHARED_APPS]
12. You also have to set where your tenant & domain models are located.
Below lines are required to specify our tenant and domain model so that Django Tenant will find these models in the application.
TENANT_MODEL = “app.Tenant”
TENANT_DOMAIN_MODEL = “app.Domain”
13. Now run the commands
These commands generate the migration files for Created models and apply those migrations into each database schema.
– python manage.py makemigrations
– python manage.py migrate
Note:- If you use to migrate, then migrations will be applied to both shared and tenant schemas!
14. Create tenants and test multi-tenancy
Step1- Create a superuser
python manage.py createsuperuser
Step2- Log In to the admin panel
http://127.0.0.1:8000/admin/
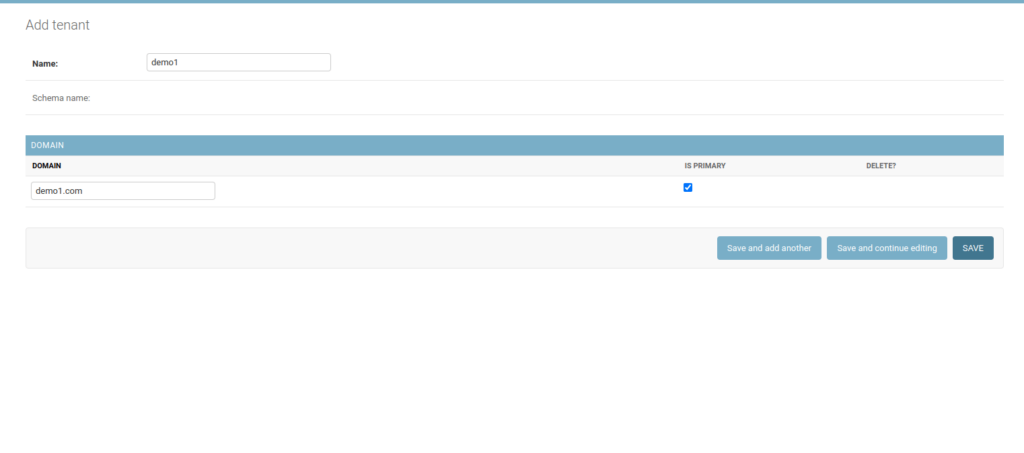
Step3- Create a Tenant from the admin panel
Step4- Create a domain from the admin panel for that Tenant
I created two tenants, demo1 and demo2
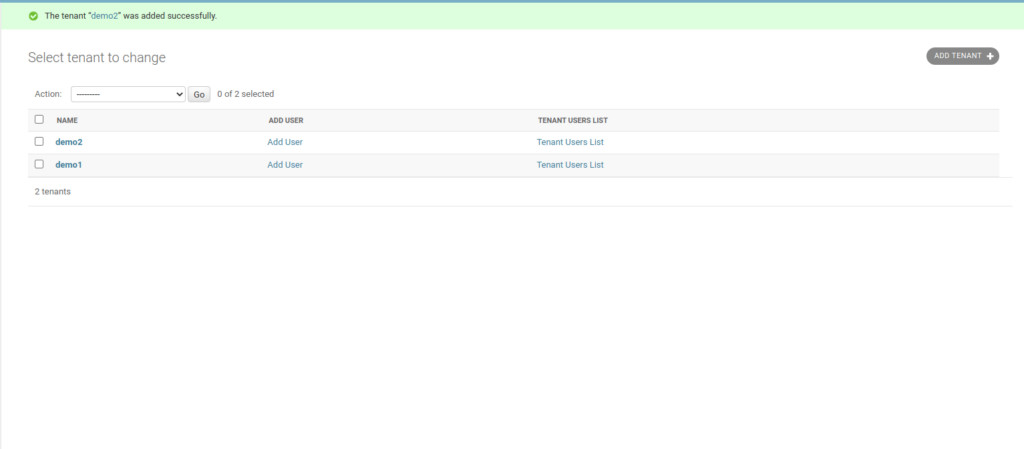
Now your Tenant is created, and also, model migrations are applied. Now you can use your tenant name to call API.
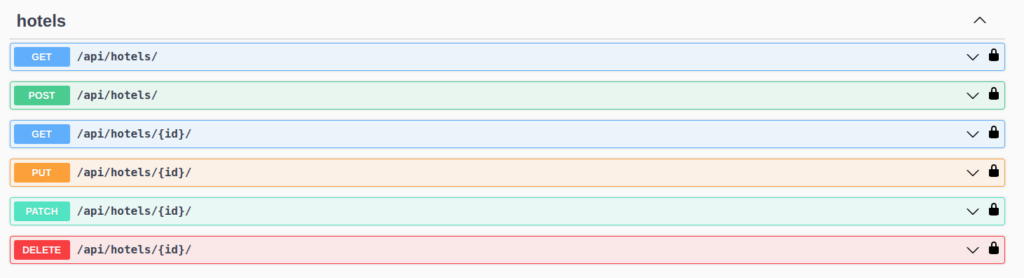
15. Create CRUD API for the Hotel model
# serializers.py file
- This file is used for creating a Django Rest Framework serializer for API.
Serializers allow complex data, such as query sets and model instances, to be converted to native Python data types and quickly rendered into JSON, XML, or other content types. Serializers also provide deserialization, allowing parsed data to be converted into complex types after validating the incoming data.
from rest_framework import serializers
from app.models import Hotel
class HotelSerializer(serializers.ModelSerializer):
class Meta:
model = Hotel
fields = “all“
# views.py file
- This file is used for creating view sets for Django Rest Framework API.
Django REST framework not only allows you to combine the logic for a set of related views in a single class called a viewset. But you may also find conceptually similar implementations like ‘Resources’ or ‘Controllers’ in other frameworks.
from rest_framework.viewsets import ModelViewSet
from app.serializer import HotelSerializer
from app.models import Hotel
class HotelViewSet(ModelViewSet):
queryset = Hotel.objects.all()
serializer_class = HotelSerializer
# urls.py file
- This file is used for creating URLs for application APIs.
REST framework supports automatic URL routing to Django and also provides a simple, quick, and consistent way of wiring your view logic to a set of URLs using a router.
from django.conf import settings
from rest_framework.routers import DefaultRouter, SimpleRouter
from app.views import HotelViewSet
if settings.DEBUG:
router = DefaultRouter(
else:
router = SimpleRouter()
router.register(“”, HotelViewSet, basename=”hotel-apis”)
urlpatterns += router.urls
Note:- Now your API is ready for the test with multi-tenancy
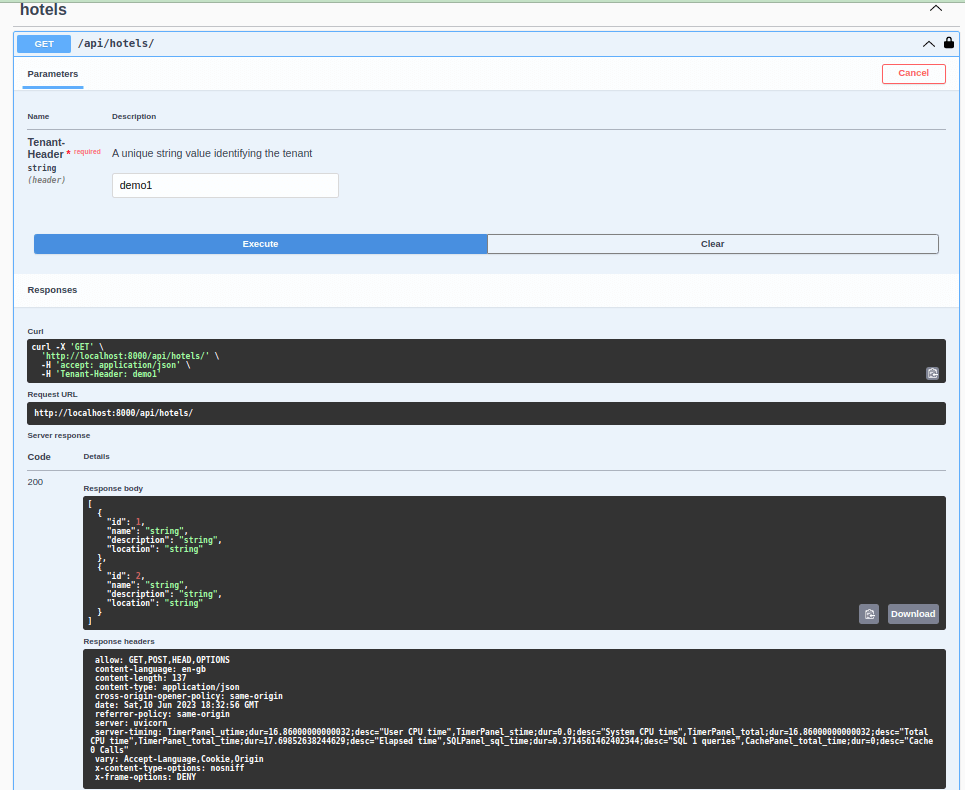
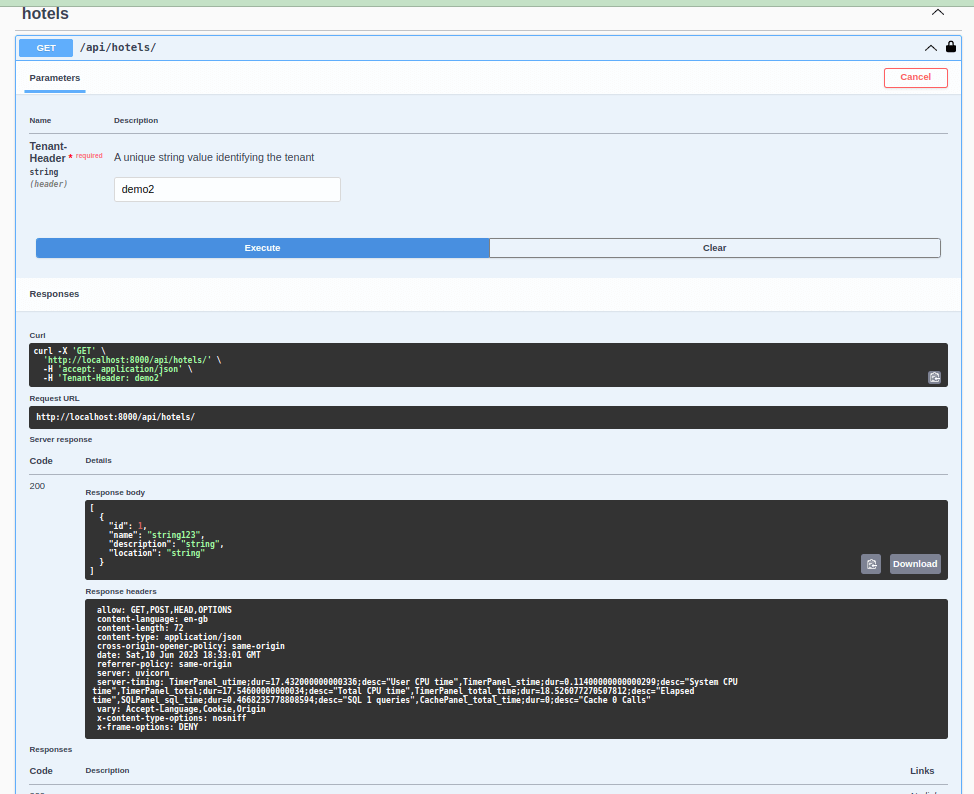
16. Call API with your Tenant (Proof of Concept)
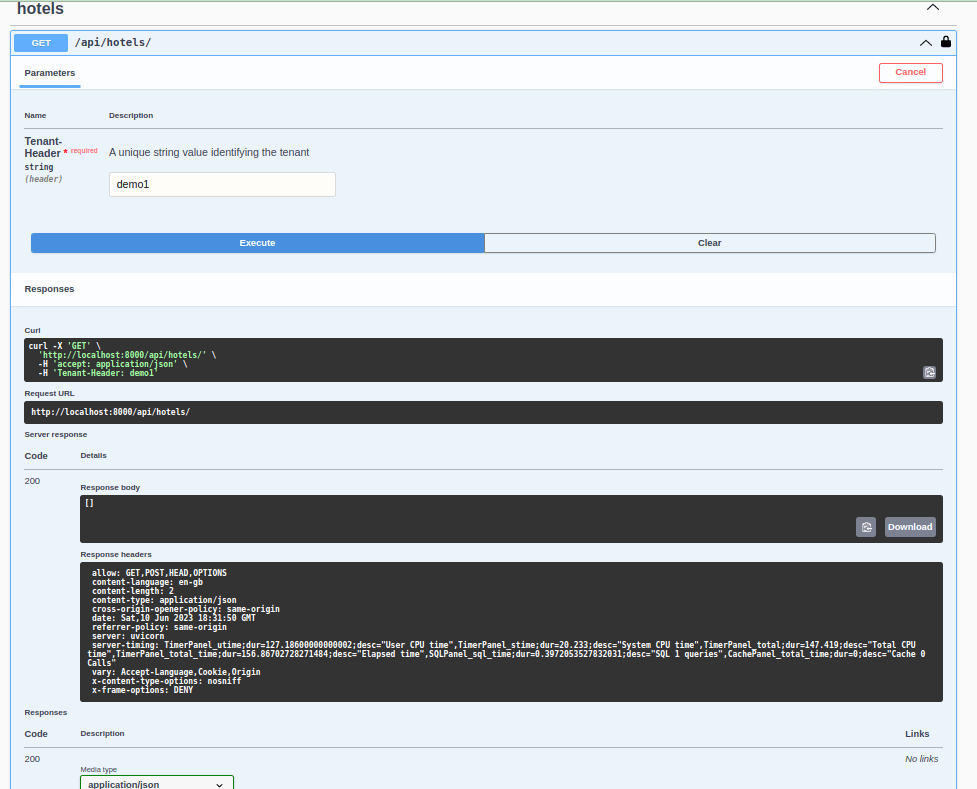
- Get API
First, call GET API for both tenants. Both tenants currently no data available in any of the tenants
- POST API
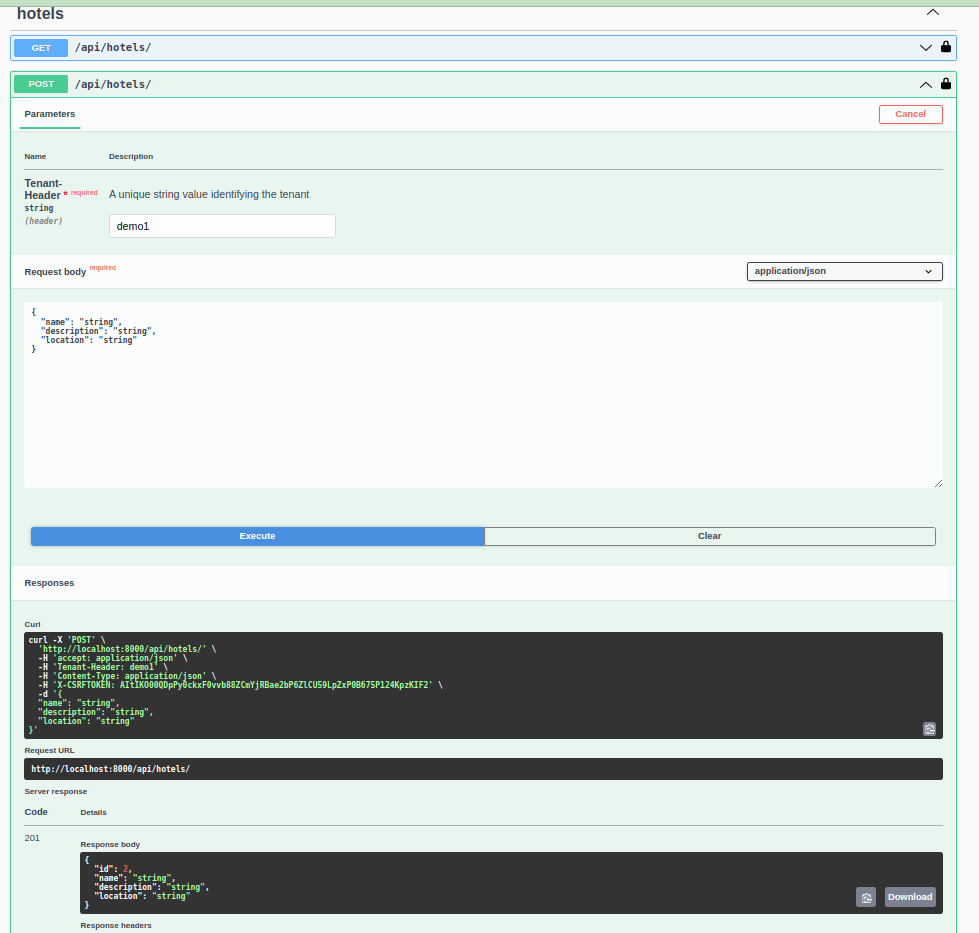
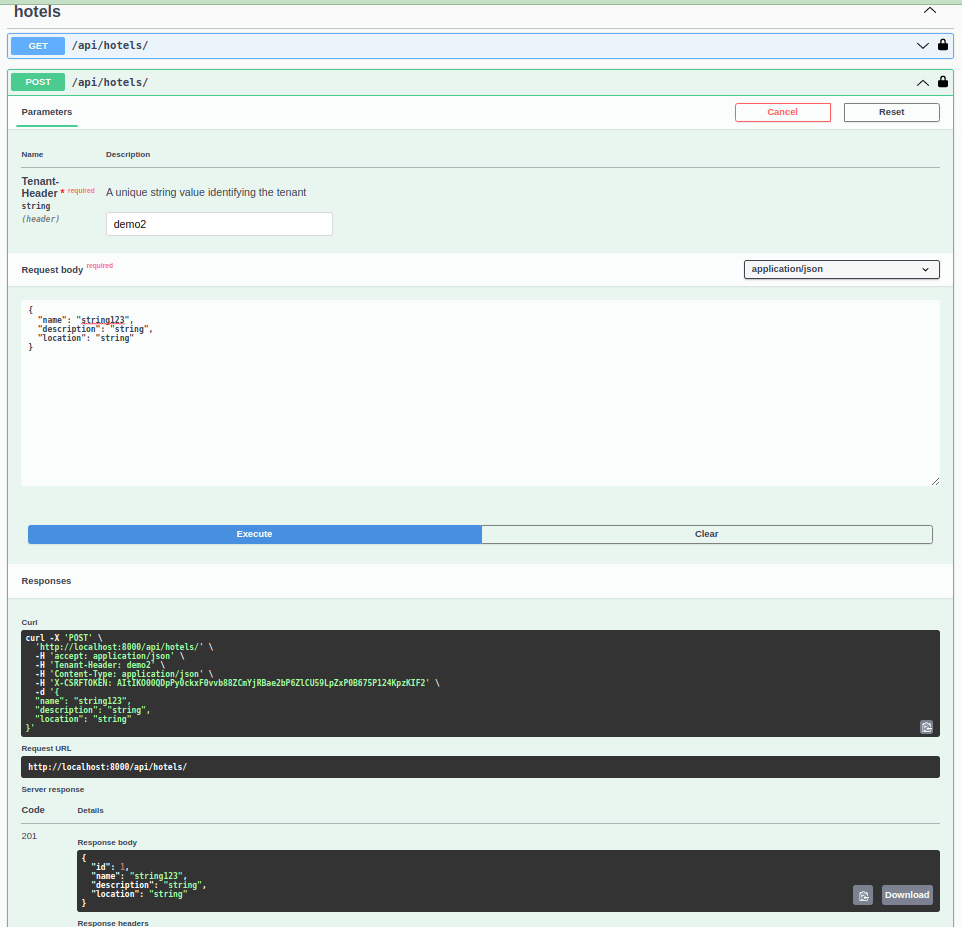
- Let’s create some data in both tenants and verify the data is isolated.
- Let’s verify data inserted in both tenants is isolated.
Note:- Here, the Tenant-Header key is responsible for your tenant name. Make sure you pass the correct tenant name in the Tenant Header. You should pass the Tenant’s name here. If passed public, then this API will use the default schema to manipulate data in the database.
Conclusion
As shown above, we create two tenants in the example, demo1 and demo2. Initially, when we get all the hotels, it returns blank lists. After that, we created two hotels in demo1 Tenant and one Hotel in demo2. After that, when we got the hotels list, in the demo1 Tenant, we were getting two hotels, and in the demo1 Tenant getting one Hotel. Also, if we check the primary key to validate that both are created in different schemas.
We successfully created a multi-tenancy application and tenants and CRUD applications based on the Tenant. With its active development and support, Django-tenant is a valuable tool if you are looking to build scalable, secure, and maintainable multi-tenant applications using Django and Postgres. Following the steps outlined in this article, you can create a scalable, secure, and customizable application that can handle a growing client base with a separate schema for each client.


An impressive share! I have just forwarded this onto a friend who
has been doing a little research on this. And he in fact ordered me lunch because I discovered it
for him… lol. So let me reword this…. Thank YOU
for the meal!! But yeah, thanx for spending time to talk about
this issue here on your web site.
This is a good tip especially to those fresh to the blogosphere.
Brief but very accurate info… Thanks for sharing this one.
A must read article!
I would like to thank you for the efforts you’ve put in writing this site.
I’m hoping to see the same high-grade blog posts from you later on as well.
In fact, your creative writing abilities has motivated me to get my very
own site now 😉
It’s a pity you don’t have a donate button! I’d definitely donate to this brilliant blog!
I suppose for now i’ll settle for bookmarking and adding your RSS
feed to my Google account. I look forward to fresh updates and
will talk about this blog with my Facebook group. Talk soon!
Quality content is the main to be a focus for the users to pay a quick visit the web page, that’s what this web site is providing.
You really make it seem so easy with your
presentation but I find this topic to be actually something
that I think I would never understand. It seems
too complicated and extremely broad for me.
I’m looking forward for your next post, I will try to get the hang of it!
If you are going for finest contents like I do,
simply visit this web site daily since it
provides quality contents, thanks
Hi my loved one! I want to say that this post is amazing, great written and come with approximately all important infos.
I’d like to see more posts like this .
Hello there! This post couldn’t be written much better!
Reading through this article reminds me of my previous roommate!
He continually kept talking about this. I am going to send this information to
him. Fairly certain he’s going to have a good read. Thank you for sharing!
Hi there! I’m at work surfing around your blog from my new
iphone 4! Just wanted to say I love reading your blog and look forward to all your posts!
Carry on the excellent work!
Nice post. I learn something new and challenging on sites I
stumbleupon everyday. It’s always useful to read through content from other authors and use a little something from other websites.
Write more, thats all I have to say. Literally, it seems as though you relied on the video to
make your point. You obviously know what youre talking about, why throw away your intelligence on just
posting videos to your blog when you could be giving us something informative to read?
you are actually a excellent webmaster. The website loading speed
is amazing. It seems that you are doing any unique trick.
In addition, The contents are masterwork. you’ve performed
a wonderful activity in this matter!
Hello! This is my first visit to your blog! We are a collection of
volunteers and starting a new initiative in a
community in the same niche. Your blog provided us beneficial information to
work on. You have done a extraordinary job!
Hey There. I found your blog the use of msn. That is a really neatly written article.
I’ll be sure to bookmark it and come back to read extra of your helpful information. Thank you for the post.
I’ll definitely comeback.
Hola! I’ve been reading your web site for a long
time now and finally got the bravery to go ahead and give you a shout out from
Houston Tx! Just wanted to mention keep up the excellent job!
If some one wants to be updated with most up-to-date technologies after that he must be visit this web
site and be up to date every day.
I got this web page from my buddy who informed me concerning this web page and now this time I am visiting this site and reading very informative articles or reviews at this time.
Just wish to say your article is as amazing. The clearness in your post is simply spectacular and i could assume you’re
an expert on this subject. Fine with your permission allow me to grab
your feed to keep up to date with forthcoming post. Thanks a million and please continue the enjoyable
work.
Hello there! This article couldn’t be written any better!
Going through this article reminds me of my previous roommate!
He continually kept preaching about this. I am going to forward this article to him.
Fairly certain he’s going to have a very good read.
Thank you for sharing!
Magnificent site. Plenty of helpful info here. I’m sending it to several friends
ans additionally sharing in delicious. And naturally,
thanks on your effort!
I read this post fully concerning the difference of newest
and preceding technologies, it’s amazing article.
These are truly fantastic ideas in on the topic
of blogging. You have touched some good points here.
Any way keep up wrinting.
Appreciate the recommendation. Will try it out.
It is in reality a nice and useful piece of information. I am glad that you shared this helpful info with us.
Please keep us informed like this. Thanks for sharing.
Hello everyone, it’s my first pay a quick visit at this web site, and post
is really fruitful in favor of me, keep up posting these types of posts.
It’s really a nice and helpful piece of info. I am satisfied that you just shared this helpful information with us.
Please keep us informed like this. Thank you for sharing.
It’s nearly impossible to find knowledgeable people in this particular subject,
however, you seem like you know what you’re talking about!
Thanks
Excellent post. I used to be checking continuously this blog and I’m impressed!
Very helpful info particularly the final phase 🙂 I care for such info much.
I was seeking this certain information for a very lengthy time.
Thank you and best of luck.
magnificent put up, very informative. I’m wondering why the opposite specialists of this sector do not realize this.
You should proceed your writing. I’m confident, you
have a huge readers’ base already!
This is really attention-grabbing, You’re an excessively skilled blogger.
I have joined your feed and look forward to searching for extra of your fantastic post.
Additionally, I have shared your website in my
social networks
It’s in reality a great and helpful piece of information. I am glad that you just shared this helpful info with us.
Please stay us up to date like this. Thank you for sharing.
Very shortly this web page will be famous amid all blogging and site-building people,
due to it’s fastidious articles or reviews
Hello, all is going well here and ofcourse every one is sharing data, that’s really
good, keep up writing.
Very energetic article, I liked that bit.
Will there be a part 2?
Hey there! I simply want to give you a huge thumbs up for the excellent information you have got here on this post.
I’ll be returning to your web site for more soon.
My brother recommended I may like this web site. He used to be totally right.
This put up truly made my day. You cann’t consider simply how a lot time I had spent for this information! Thanks!
Pretty nice post. I just stumbled upon your blog and wished to say that I’ve truly enjoyed browsing your
blog posts. After all I’ll be subscribing to your
feed and I hope you write again soon!
Good day! I could have sworn I’ve visited this
site before but after going through some of the articles I realized it’s new to
me. Anyhow, I’m definitely pleased I found it and I’ll
be book-marking it and checking back often!
Wow, amazing weblog structure! How lengthy
have you ever been running a blog for? you make running a blog look easy.
The entire glance of your website is fantastic, let alone
the content!
I’m not that much of a internet reader to be honest but your sites really nice,
keep it up! I’ll go ahead and bookmark your site to come back down the road.
Cheers
It’s remarkable to pay a quick visit this web site
and reading the views of all colleagues concerning this post, while I am also keen of getting knowledge.
Hello! I’ve been following your web site for a
long time now and finally got the bravery to go ahead
and give you a shout out from Porter Texas! Just wanted to tell
you keep up the excellent work!
If some one wants to be updated with latest technologies therefore he must be pay a visit this web site and
be up to date all the time.
I think this is one of the most important info for me.
And i’m glad reading your article. But wanna remark on few general things, The website style is perfect,
the articles is really nice : D. Good job, cheers
Hi to every single one, it’s in fact a nice for me to visit this website, it includes valuable Information.
I take pleasure in, result in I found just
what I used to be having a look for. You have ended my 4 day long hunt!
God Bless you man. Have a great day. Bye
Greetings! Very useful advice in this particular article!
It is the little changes that make the largest changes.
Many thanks for sharing!
bookmarked!!, I really like your blog!
I am sure this post has touched all the internet users, its really really good
piece of writing on building up new weblog.
Good write-up. I definitely appreciate this site.
Keep it up!
I like what you guys are usually up too. This sort of clever work and exposure!
Keep up the very good works guys I’ve added you guys to my blogroll.
Hello there! This article couldn’t be written much better!
Going through this article reminds me of my previous roommate!
He constantly kept talking about this. I am going to send this article
to him. Pretty sure he’ll have a great read.
I appreciate you for sharing!
Wow! At last I got a webpage from where I be able to
really obtain helpful information concerning my study and knowledge.
This is my first time go to see at here and i am in fact impressed to read everthing at alone place.
I enjoy what you guys tend to be up too. This kind of clever work and exposure!
Keep up the good works guys I’ve included you guys to my own blogroll.
Wonderful article! We are linking to this particularly great article on our website.
Keep up the good writing.
I think the admin of this web page is in fact working hard in favor of his site, since here
every stuff is quality based data.